 |
| Photo Credit to Mel's Kitchen Cafe |
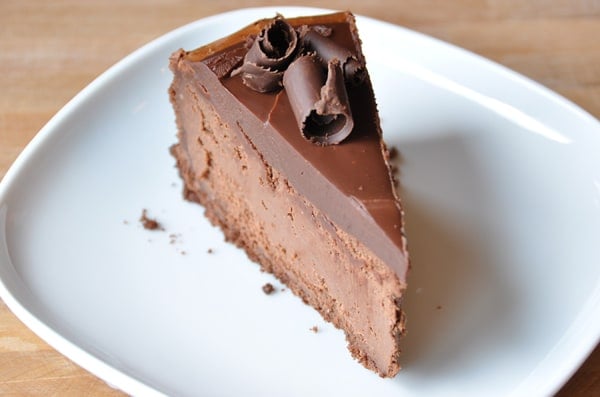
Decadent Chocolate Cheesecake
Crust:9-ounce package of chocolate cookies (such as chocolate wafers, graham crackers or teddy grahams)
1 tablespoon sugar
6 tablespoons butter, melted
Filling:
10 ounces semisweet or bittersweet chocolate, chopped (use the best quality you can afford – I love the Ghirardelli Bittersweet Chips and I’m not ashamed to admit I buy them in bulk, often, at Sam’s Club)
4 (8-ounce) packages cream cheese, room temperature
1 1/4 cups plus 2 tablespoons sugar
1/4 cup unsweetened cocoa powder
4 large eggs
Topping:
3/4 cup whipping cream
6 ounces semisweet or bittersweet chocolate, chopped
1 tablespoon sugar
Chocolate curls for garnish (I use this method)
For crust: Preheat the oven to 350°F. Butter a 9-inch springform pan with 3-inch-high sides (or use a 10-inch springform pan with 2-inch sides). Process the chocolate cookies in a food processor (or the old-fashioned way with a bag and a rolling pin) until they are finely ground. Transfer them to a small bowl and mix in the sugar. Add the melted butter and mix until well combined. Press the crumbs evenly onto the bottom only of the prepared pan. Bake just until set, about 5 minutes. Cool while preparing filling. Keep the oven heated at 350 degrees.
For filling: Melt the 10 ounces of chocolate in the microwave or in a double boiler until melted and smooth. Cool the chocolate until lukewarm but ensure that it is still warm enough to be pourable. In a large bowl (or with a stand mixer), blend cream cheese, sugar, and cocoa powder until smooth. Blend in eggs one at a time. Mix in lukewarm chocolate. Pour the cheesecake filling over the crust; smooth the top. Bake until the center is just set and just appears dry, about 1 hour. Remove the cheesecake from the oven and cool on a wire rack for 10 minutes. Run knife around sides of cake to loosen. Let the cheesecake cool to room temperature. Cover lightly with plastic wrap and chill overnight.
For topping: One hour before serving (or up to 3 days ahead of time), stir cream, 6 ounces chocolate, and sugar in heavy medium saucepan over low heat until smooth. Cool slightly. Pour over the center of the cheesecake, spreading to within 1/2 inch of edge and filling any cracks. Chill until the topping is set, about 1 hour.
When ready to serve, release the springform pan sides. Transfer the cheesecake to a platter. Top with chocolate curls. It is preferable to let the cheesecake stand at room temperature for 1-2 hours before serving.
Recipe Source: Mel's Kitchen Cafe


.jpg)


")