Tuesday, April 9, 2013

Oreo Cheesecake Bites

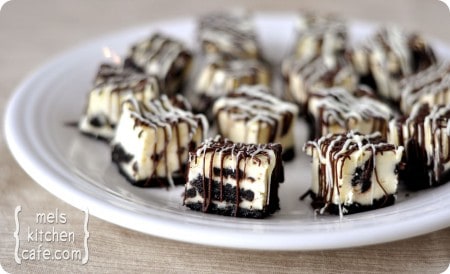
Photo Credit to Mel's Kitchen Cafe
I made these babies to share with some people at church. I figured they would be perfect to share. And then I did not want to. That's the problem with being a baker. You make lots of delicious stuff that you plan on sharing, then you eat it all...
Almost.
Now, I didn't really eat them all. But I was fighting my body the whole time.
And I gave some away. And all who received them raved. Yay for awesome recipes.
I love soggy cookie stuff and really moist crust. I love oreos.
So, of course, I love these. {a lot}
Photo Credit to Mel's Kitchen Cafe; Yes, this dessert deserves two pictures
Oreo Cheesecake Bites
36 Oreo Cookies, divided
1/4 cup (4 tablespoons) butter
4 packages (8-ounces each) cream cheese, softened
1 cup granulated sugar
1 cup sour cream
1 teaspoon vanilla
4 large eggs
4 ounces semisweet chocolate
4 ounces white chocolate

Preheat the oven to 325°F.
Line a 9×13-inch baking pan with foil, with ends extending over sides. Finely crush 24 Oreo cookies. Melt 1/4 cup butter; mix with crumbs. Press onto bottom of prepared pan.
In a large bowl, beat the cream cheese and sugar with mixer until blended. Add sour cream and vanilla; mix well. Add eggs, one at a time, beating after each just until blended. Chop remaining cookies. Gently stir into batter; pour over crust.
Bake the cheesecake for about 35-40 minutes or until the sides are set and the center is almost set. Cool completely on a wire rack in the pan.
When the cheesecake is completely cooled, cover with plastic wrap and refrigerate for at least 2 hours. When chilled, remove the cheesecake using the foil overhang and cut the cheesecake into bite-sized pieces. Place the cheesecake bites on a wax or parchment paper-lined baking tray. Melt the semisweet chocolate and white chocolate in separate bowls (I use the microwave on 50% power, stirring frequently). Pour the melted chocolate into a ziploc bag, one for the semisweet chocolate, one for the white chocolate. Snip a small corner off the corner of the bag and drizzle the chocolate over the cheesecake bars. Chill the bars until ready to serve. Alternately, the drizzled bites can be frozen in an airtight container for up to a month. Let them defrost in the refrigerator and serve chilled.

Note: Next time I will be doubling the crust and/or adding more chunks of oreo to the bites. {Told you I loved soggy cookie stuff/crust}

Recipe Source: Mel's Kitchen Cafe

Thursday, April 4, 2013

{Healthy} Curried Noodles & Shrimp

Another awesome recipe from Mom's Who Think. I didn't try a lot in this week of meal planning, but these noodles were yummy, easy, and healthy. What more could you ask for in a weeknight meal?
Gizzi's Spicy Singapore Curried Noodles
Photo Credit to Cook Yourself Thin
Curried Noodles & Shrimp
2 Tablespoons canola or grape seed oil
1 medium yellow onion, sliced
1 small red bell pepper, sliced
1 pound fresh or thawed frozen small peeled and deveined shrimp
2 teaspoons curry powder
½ teaspoon salt
8 ounces cellophane or rice-stick noodles, soaked as package label directs, rinsed and drained
3 cups fresh bean sprouts, root ends trimmed and discarded, rinsed
2 green onions, cut in half lengthwise and cut crosswise into 2-inch pieces
1 egg, beaten

Grease a large nonstick skillet with nonstick cooking spray and heat over medium-high heat until hot. Add 1 Tablespoon oil and heat until hot but not smoking, and add the yellow onion and bell pepper and stir fry until softened, about 3 minutes. Add the shrimp and stir fry until pink, about 2 minutes. Scrape the mixture into a medium bowl.

Heat the remaining Tablespoon of oil in the skillet and add the curry powder and salt. Stir until fragrant, 1 minute. Add the noodles, bean sprouts, and green onions and toss to coat with the curry oil. Drizzle the egg over the mixture and toss occasionally to spread the egg while it cooks through the mixture. Serve immediately.

Recipe Source: Mom's Who Think

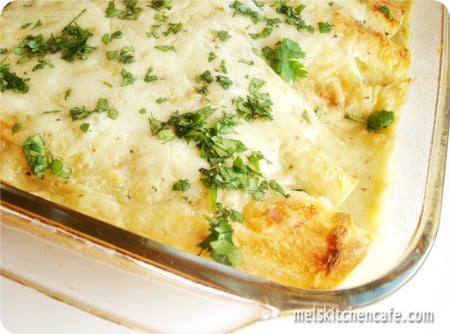
Creamy Green Chile Chicken Enchiladas

So you know when you eat something and go "That was delicious, filling, and totally healthy. I know that because I made everything from scratch." This is not one of those. Yes, it is filling, and made from scratch, and to die for delicious, but it is not healthy in any way.
That means I have to limit how I often I make this. Shoot.
Because it is rockin.
chicken enchiladas
Photo Credit to Mel
Creamy Green Chile Chicken Enchiladas
3 cups cooked, chopped chicken
2 (4 oz.) cans of green chiles, lightly drained
1 package (8 oz.) cream cheese, cubed
1 can white or black beans, rinsed and drained (you can really use any type of bean you prefer here)
Sauce:
2 tablespoons butter
1/2 cup chopped onion (about 1/2 medium onion)
2 tablespoons flour
1/3 cup chicken broth
¼ cup milk
¼ teaspoon salt
¼ teaspoon pepper
1 can (7 ounce) green chile enchilada sauce
½ cup sour cream

8 ounces (about 2 cups) Monterey jack cheese, shredded
8 medium (soft taco size) flour tortillas
Handful of chopped fresh cilantro

Preheat oven to 375 degrees.
In a medium bowl, combine the softened cream cheese and green chiles. Mix well. Add the chicken and black beans. Mix to combine. Set aside.
In a large nonstick skillet, melt the butter over medium heat. Add the onion and cook, stirring occasionally, until the onion softens and starts to turn translucent, about 3-4 minutes. Sprinkle the flour over the onions and stir well. Cook for 1 minute, stirring. Slowly whisk in the chicken broth and milk. As you whisk and the mixture cooks, the flour will get less lumpy around the onions and the mixture will become smooth. Cook over medium heat until the mixture is bubbling and has thickened, about 4-5 minutes. Remove the skillet from the heat and stir in the enchilada sauce and sour cream.
Lightly grease a 9X13-inch baking dish. Spread about 1/4 cup of the sauce on the bottom of the dish. Fill each tortilla with about ½ cup of the chicken/cream cheese filling. Top with a small handful of shredded cheese, a couple tablespoonfuls for each enchilada. Save at least 1/2 cup cheese for the top of the enchiladas. Roll the tortillas up and place seam side down in the prepared baking dish. Continue filling enchiladas until the dish is full (I can easily fit 8 enchiladas in one pan).
Pour the white sauce over the top of the enchiladas. Top with remaining cheese. Bake for 20-30 minutes until the enchiladas are bubbling, hot and lightly browned. Sprinkle fresh cilantro over the top and serve.

**Make Ahead Instructions: Follow the recipe instructions, letting the sauce cool to warm room temperature before proceeding with filling the enchiladas. Assemble the enchiladas as directed in the recipe with the cooled sauce. Cover the baking pan with plastic wrap and refrigerate for 8-12 hours before baking. Bake according to the recipe, adding an additional 5-10 minutes if needed since the enchiladas were refrigerated. Alternately, after assembling, the baking pan can be covered with a double layer of foil and put in a jumbo-sized resealable bag and frozen for up to two months. Bake from frozen by decreasing the baking temperature to 350 degrees F and baking the enchiladas covered for 1 1/2 hours. Uncover and bake an additional 30 minutes to 1 hour until the dish is hot and bubbly.

Recipe Source: Mel's Kitchen Cafe

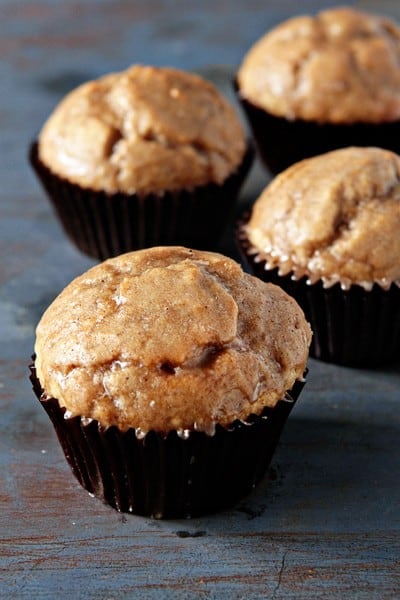
Chai Spiced Glazed Doughnut Muffins

Fine, I'll admit it. I had chai tea once. I don't drink tea. I didn't know it was tea, it was a sample. And it was so delicious. There's been a little depression since I found out it was tea and decided not to drink it.
However.
These muffins do Chai tea justice it desperately needs! Oh, they are spiced wonderfully and have a perfect glaze to accompany them. Anytime I get the urge for Chai tea, I guess I'll just have to whip up these beauts.
Post image for Chai Spiced Glazed Doughnut Muffins
Photo Credit to My Baking Addiction
Chai Spiced Glazed Doughnut Muffins
Muffins:
1/4 cup butter
1/4 cup vegetable oil
1/2 cup granulated sugar
1/3 cup light brown sugar
2 large eggs
1 1/2 teaspoons baking powder
1/4 teaspoon baking soda
2 teaspoons ground cinnamon
1 teaspoon ground ginger
1 teaspoon ground cardamom
1/2 teaspoon ground allspice
1/4 teaspoon finely ground black pepper
3/4 teaspoon salt
1 teaspoon vanilla extract
2 2/3 cups all-purpose flour
1 cup milk
Glaze:
3 tablespoons butter; melted
1 cup confectioners’ sugar; sifted
1/4 teaspoon cinnamon
1/8 teaspoon ground ginger
1/8 teaspoon ground cardamom
1/8 teaspoon ground allspice
3/4 teaspoon vanilla
1 tablespoon milk

Preheat the oven to 425°F. Lightly grease a standard muffin tin, or line with 12 paper muffin cups.
In a medium-sized mixing bowl, cream together the butter, vegetable oil, and sugars until smooth. Add the eggs one at a time, beating to combine.
Stir in the baking powder, baking soda, cinnamon, ginger, cardamom, allspice, black pepper, salt and vanilla. Mix well to fully incorporate.
Stir the flour into the butter mixture alternately with the milk, beginning and ending with the flour and making sure everything is thoroughly combined.
Using a large scoop (about 3 tablespoons), divide the batter evenly into the prepared pan, filling the wells nearly full.
Bake the muffins in preheated oven for 15 to 17 minutes, or until they’re a pale golden brown and a cake tester inserted into the middle of one of the center muffins comes out clean. Prepare the glaze.

In a medium bowl, mix together the melted butter, confectioners’ sugar, spices, vanilla and milk. Whisk until smooth.
When muffins have cooled slightly (about 5 minutes), dip the muffin crown into the glaze and allow the glaze to harden. At this point, you can leave them as is or go for the double dip. I glazed my muffins twice.
Serve warm, or cool on a rack and wrap airtight. Muffins will keep at room temperature for about a day.

Recipe Source: My Baking Addiction

Pumpkin Cinnamon Rolls

We were in Seattle for Thanksgiving. I'm a doer, right? I love to be involved and do...everything {whether or not I have the time or energy...I'm crazy sometimes}. So when I heard that we didn't have to do anything for dinner on Thanksgiving {because my awesome Brother in law was doing everything himself...awesome guy!}, I started to panic a little. I have to make something for Thanksgiving.

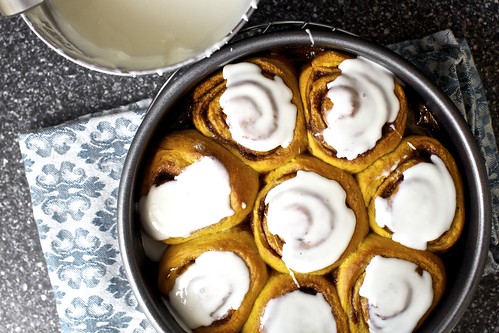
Then I offered to do breakfast and found this recipe. Who doesn't like warm homemade rolls on a rainy Thanksgiving morning? They were delicious and ooey gooey {Yes, that's a word...ooey} with a hint of pumpkin. Loved them!
pumpkin cinnamon rolls
Photo Credit to Smitten Kitchen
Pumpkin Cinnamon Rolls
Yield: 16 to 18 buns
Dough:
6 tablespoons unsalted butter, to be divided
1/2 cup whole milk, warmed (but not over 116 degrees)
2 1/4 teaspoons active dry yeast (from 1 .25-ounce or 7 gram envelope yeast)
3 1/2 cups all-purpose flour, plus extra for rolling out
1/4 cup (packed) light or dark brown sugar
1/4 cup granulated sugar
1 teaspoon table salt
1/2 teaspoon ground cinnamon
1/4 teaspoon freshly grated nutmeg
1/8 teaspoon ground cardamom (optional)
1/4 teaspoon ground ginger
2/3 cups pumpkin puree
1 large egg
Oil for coating rising bowl

Filling:
3/4 cup (packed) light or dark brown sugar
1/4 cup granulated sugar
1/8 teaspoon table salt
2 teaspoons ground cinnamon

Glaze:
4 ounces cream cheese, softened
2 tablespoons milk or buttermilk
2 cups powdered sugar, sifted
Few drops vanilla extract

Make your dough: Melt your butter, and hey, if you’re melting it in a little saucepan, you might as well brown it for extra flavor. Once the butter has melted, keep cooking it over medium heat for a few additional minutes. It will become hissy and sizzle a lot, then take on a nutty flavor as golden bits form at the bottom of the pot. Remove from heat and set aside to cool slightly.
Combine your warmed milk and yeast in a small bowl and set aside. After five to seven minutes, it should be a bit foamy. If it’s not, you might have some bad yeast and should start again with a newer packet.
In the bottom of the bowl of an electric mixer combine flour, sugars, salt and spices. Add just 1/4 cup (or two-thirds of; leave the rest for assembly) of your melted/browned butter and stir to combine. Add yeast-milk mixture, pumpkin and egg and mix combined. Switch mixer to a dough hook and run it for 5 minutes on low.
Scrape mixture into a large oiled bowl and cover with plastic wrap. Set aside for 1 hour in a draft-free place; it should just about double.
While it is rising, line the bottom of two 9-inch round cake pans (8-inch round should work too, as does an 8-inch square) with parchment paper and butter the sides of the pan and the paper.

Assemble buns: Scoop dough onto a very well floured surface and flour the top of it well. With a rolling pin, roll the dough to an approximately 16×11-inch rectangle. Brush reserved melted/browned butter over dough. Stir together remaining filling ingredients and sprinkle mixture evenly over dough. Starting on a longer side, roll the dough into a tight spiral. It’s going to make a mess because the dough is crazy soft and some stuff spills off the ends; don’t sweat it. It will all be delicious in the end.
Here’s how to cut cinnamon rolls without squishing their pretty spirals: With a sharp serrated knife, using absolutely no pressure whatsoever (only the weight of the blade should land on the dough) gently saw your log with a back-forth motion into approximately 1-inch sections. When a soft dough like this is rolled, it tends to grow longer, which means that you’ll have the option to either make more buns (say, 18 instead of 16) or just cut them a little larger (in generous inches).

Divide buns between two prepared pans. You can sprinkle any sugar that fell off onto the counter over them. Cover each pan with plastic wrap and let rise for another 45 minutes.
If you’re doing this ahead of time, you can now put them in the fridge overnight. In the morning, leave them out for an hour to warm up and finish rising.
15 minutes before you’re ready to bake them, heat the oven to 350°F. Meanwhile, you can make the glaze. Beat your cream cheese until it is light and fluffy. Add powdered sugar and vanilla. Drizzle in milk until you get the consistency you’re looking for, either thick enough to ice or thin enough to drizzle.

Finish your buns: Remove the plastic and bake buns for 25 minutes, until puffed and golden and the aroma brings all the boys to your yard is like a snickerdoodle. Transfer pans to wire cooling racks and drizzle/schmear with cream cheese glaze, then have at them.

Recipe Source: Smitten Kitchen

Hot Chocolate Cookies

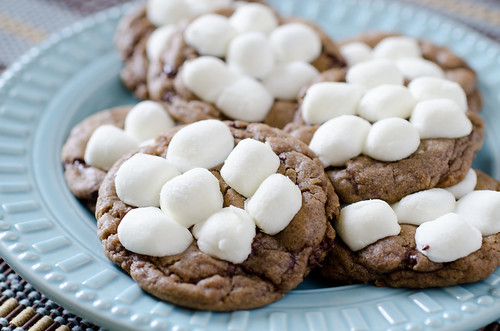
During January I got on this cookie kick. I seriously couldn't stop. It was a little ridiculous {delicious, but ridiculous}. Thanks to pinterest, when I was craving a hot chocolate, but didn't want to have a hot drink in my belly...I had these babies waiting!
Now, they are not my absolute favorite cookie. But...they are delicious and I love the whole idea of the hot chocolate cookie. So you can bet I will be making these again. Probably not during the summer {but if you know me...you also know a cookie craving-even if it is a hot chocolate cookie-can hit at any time}.
Hot Chocolate Cookies
Photo Credit to Seeded at the Table
Hot Chocolate Cookies
1 cup unsalted butter, at room temperature
1 cup granulated sugar
2/3 cup brown sugar
2 eggs
1 teaspoon vanilla extract
3 1/4 cups all-purpose flour
4 packages (or 1/2 cup plus 3 Tablespoons) Hot Chocolate Mix
1 1/4 teaspoon baking soda
1 teaspoon salt
1 cup miniature semi-sweet chocolate chips
2 cups miniature marshmallows

Preheat the oven to 350 degrees F. Line baking sheets with parchment paper or silicone mat.

In a large mixing bowl, cream together the butter and sugars until light and fluffy. Beat in the eggs, one at a time, then blend in the vanilla.

In a separate medium bowl, whisk together the flour, hot chocolate mix, and baking soda and salt. Slowly add to the wet ingredients and mix just until combined, scraping the sides of the bowl as needed. {My dough was dry, so to avoid crumbly cookies, I added a little milk and it worked wonderfully} Fold in the chocolate chips.

Drop dough balls onto the prepared cookie sheets and bake for 7 minutes. Remove the cookies from the oven. Working quickly, carefully add about 5 to 7 miniature marshmallows to the top of each cookie, and gently press. Return to the oven and bake an additional 2 to 3 minutes, or until the marshmallows start to puff. Remove from the oven and let cool on the cookie sheets for 10 minutes before removing. Transfer to a wire rack to cool completely.

Recipe Source: Seeded at the Table

Creamy Orzo with Asparagus

When I acquire a random ingredient, it's not often I don't already have a recipe pinned. However, when receiving asparagus from my Bountiful Basket a few weeks ago, I didn't like any I had pinned and I searched on google. I know. Weird.
Luckily, I found this awesome, easy, recipe which made me love asparagus even more than my green heart did.
Photo Credit to Celeste
Creamy Orzo with Asparagus
1 cup orzo
1 cup asparagus, cut into 1 inch pieces
1 tbsp butter or margarine
1/4 to 1/2 cup cream
1/4 cup grated parmesan cheese
Salt & Pepper, to taste

Bring a large sauce pan of water (filled about halfway) to a boil over medium heat. Cook the orzo until tender, about 10 minutes.

After the orzo has been cooking for about 5 minutes, add the asparagus to the same pot (this will allow the orzo and asparagus to cook in the same pot and keep the clean-up to a minimum!).

Once the orzo and asaparagus are cooked and tender, drain and return to the pot.

Quickly add the parmesan cheese and butter. Stir thoroughly, allowing both the cheese and butter to melt. Slowly add the cream to the mixture, while stirring. Continue to stir and add cream until you reach your desired consistency.

Season with salt and pepper.

Voila! You have a delicious side dish! Serve immediately.

Recipe Source: Sugar & Spice by Celeste

Chicken Tikka Masala

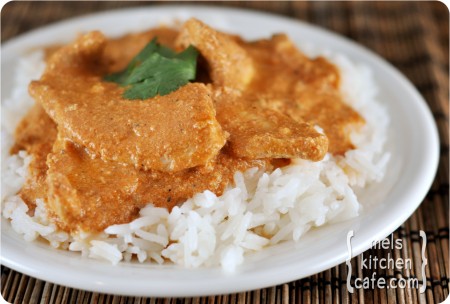
Apparently Chicken Tikka Masala is very popular in British restaurants {thanks Wikipedia}. Never would have guessed that. I guess no one really knows where it came from. And there are lots of different recipes with no ingredients the same.
Okay. Now that I've gotten the history out of my system, we can talk about how delicious this stuff is. It's curry-like. I would have guessed Indian. A little kick to it. Awe.Some.
Photo Credit to Mel's Kitchen Cafe
Chicken Tikka Masala
Marinade:
1 cup plain yogurt
1 tablespoons lemon juice
2 teaspoons ground cumin
1 teaspoon ground cinnamon
1/2 teaspoon cayenne pepper
1 1/2 teaspoons paprika
2 teaspoons black pepper
1 tablespoons minced fresh ginger
1 teaspoon salt
3 boneless, skinless chicken breasts, cut into thin strips or chunks

For the masala:
1 tablespoon butter
1 clove garlic, minced
1 jalapeno pepper, finely chopped
2 teaspoons ground cumin
2 teaspoons paprika
1/2 teaspoon salt
8 ounces tomato sauce
1 cup cream
1/4 cup chopped fresh cilantro

For the marinade, combine all ingredients except chicken. Pour sauce over chicken and refrigerate for one hour or up to 8 hours. Grill or cook chicken in frying pan. Discard marinade.
For the masala, melt butter in large skillet over medium heat. Saute garlic and jalapeno for one minute. Season with cumin, paprika and salt. Stir in tomato sauce and cream. Simmer on low heat until sauce thickens, about 20 minutes. Add grilled chicken and simmer for 10 minutes. Garnish with fresh cilantro. Serve over hot rice.

Recipe Source: Mel's Kitchen Cafe

Red Velvet Cheesecake Cake

Thank Heaven for birthdays and people requesting me to make deliciousness. It was my MIL's birthday a couple of weeks ago. She requested that I make something. Anything. That's hard for me. Do you know how many desserts I pin on pinterest? {I limit myself to 300 in case you were wondering}.
I narrowed it down to 11, then 7, then 3. I couldn't go any further, so I had Scott pick one. He said {and I quote} "I don't really like red velvet, but lets do this one because the others don't look good to me." 
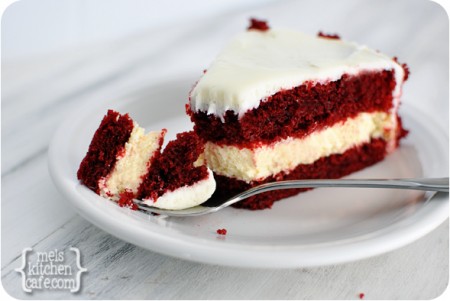
melskitchencafe.com: Red Velvet Cheesecake Cake
Photo Credit to Mel's Kitchen Cafe
Say Whaaa?
He's not picky. He almost never has an opinion because he likes everything. Oh no...I'm married to a crazy person. Don't get me wrong, I love him. But who doesn't like red velvet? {Oh, that's right, my husband} It's like the light chocolate of the gods.
Don't worry, friends. I don't let that stop me from making all the red velvet flavored goodies I can find. {Sigh of relief}
So...add cheesecake to the wonderfulness of red velvet and you get this decadent, surprisingly-not-too-rich cheesecake cake that takes you away from whatever earthly ridiculousness you are going through and gives you a moment in Heaven.
{Does that make you want to try it. No? Then make it now! Or else!}
Disclaimer: It has a lot of steps...not hard, just a lot. But all of them can be completed a couple of days beforehand, so just plan ahead.
Photo Credit to Me
Red Velvet Cheesecake Cake
Cheesecake Layer:
2 (8-ounces each) packages cream cheese, at room temperature
2/3 cup granulated sugar
pinch of salt
2 large eggs
1/3 cup sour cream
1/3 cup heavy whipping cream
1 teaspoon vanilla extract
Red Velvet Cake Layer:
2 1/2 cups all purpose flour
1 1/2 cups granulated sugar
3 tablespoons natural, unsweetened cocoa powder (not Dutch-process)
1 1/2 teaspoons baking soda
1 teaspoon salt
2 large eggs, at room temperature
1 1/2 cups vegetable or canola oil
1 cup buttermilk
1/4 cup (two 1-ounce bottles) red food coloring
2 teaspoons vanilla extract
2 teaspoons white vinegar
Cream Cheese Frosting:
2 (8-ounces each) packages cream cheese, at room temperature
1/2 cup (8 tablespoons) butter, at room temperature
1 teaspoon vanilla extract
2 1/2 cups powdered sugar

Make the cheesecake layer first so it has time to chill while the cake and frosting are being prepared. Preheat the oven to 325 degrees F. Lightly coat a 9-inch springform pan with nonstick spray. In a large bowl with a handheld electric mixer or in the bowl of an electric stand mixer, whip the cream cheese until it is smooth and creamy. Mix in the sugar and salt and blend for 2 minutes, scraping down the sides of the bowl as needed. Add the eggs, one at a time, blending after each addition. Mix in the sour cream, whipping cream and vanilla and beat until smooth. Don't overbeat - just mix until smooth and creamy. Pour the batter into the prepared pan. Bake the cheesecake for 40-45 minutes until it is set and not jiggly in the middle. Remove the cheesecake from the oven and let it rest on a wire rack until completely cooled. Wrap the pan in foil and place the cooled cheesecake in the freezer until ready to assemble.Note: this cake can be assembled start to finish and refrigerated, well-covered, for up to two days before serving. If you don't have time to make it all at once, the cheesecake layer can be baked, cooled and frozen up to several weeks in advance.

For the red velvet cake, preheat the oven to 350 degrees F. Grease and flour two 9-inch round metal baking pans. In a large bowl, whisk together the flour, sugar, cocoa powder, baking soda and salt. Make a well in the center of the dry ingredients and add the eggs, oil, buttermilk, food coloring, vanilla and vinegar. Whisk until fully combined, and continue whisking for another minute or two until the batter is thick and smooth, scraping down the sides as necessary. Spread the batter evenly into the prepared pans, dividing equally. Bake for 28-30 minutes, until a toothpick inserted in the center comes out with a few moist crumbs attached (don't overbake or the cake layers will be dry). Let the cakes cool in the pans for 5-10 minutes. Run a knife around the edge of the pans, then invert cakes onto a piece of parchment or wax paper set on a cooling rack. Let them cool completely.

Prepare the frosting, by whipping the cream cheese with an electric handheld mixer in a large bowl or in the bowl of an electric stand mixer until smooth and creamy. Add the butter and vanilla and mix. Gradually add the powdered sugar and mix on high speed until it is light and fluffy and creamy.
To assemble, cut each of the cake layers in half to form two thinner cake layers (so you'll have four thin cake layers total). Place one of the bottom halves in the middle of a serving platter or cake plate. Remove the cheesecake from the freezer. Gently loosen it from the sides and bottom of the pan with a flat knife/spatula that has been run through hot water (this will help loosen it from the pan). When removed, lay the cheesecake layer on top of the red velvet cake layer on the serving plate. Place another red velvet cake layer on top of the cheesecake. Try to choose the layers that are the flattest on top and bottom so that the cake, when frosted, doesn't tilt or look like it is uneven. Crumble the remaining two cake layers into small crumbs and set aside.

Frost the cake by scooping dollops of the frosting on top of the cake and using an offset spatula, spread the frosting over the tops and sides. The sides will be covered up with cake crumbs so they don't need to be perfectly frosted - just make sure there is an even layer of frosting so the cake crumbs can adhere to the cake. Swirl the frosting across the top. Carefully gather handfuls of cake crumbs and press them into the sides of the cake. You'll have a mess, but don't worry, it is easy to gently sweep the fallen cake crumbs out of the way. Keep pressing them to the sides until the entire perimeter of the cake is completely covered.
Cover the cake lightly (or else the cake crumbs on the side will dry out) and refrigerate until ready to serve. The cake can be made up to two days in advance and chilled until serving.

Note: If you don't have time to make it all at once, the cheesecake layer can be baked, cooled and frozen up to several weeks in advance.
Also, I was worried that all of the frosting would make it too rich, so I only used 2/3-3/4 of it, but I think I was mistaken. Next time I will definitely try it with all the frosting. If you do, let me know how it is!

Recipe Source: Mel's Kitchen Cafe