Sunday, December 16, 2012

All Bran Muffins

All growing up, my grandma Schwartz made the same few things. Roast. Grilled cheese. Chocolate chip cookies.   Funeral potatoes. Gravy, turkey, and rolls. Chicken noodle soup. Bread. And All-Bran muffins...delicious, moist, "fool you with their deliciousness but they're really healthy" muffins. They fooled me all growing up, but now I just delight in the fact that they are fiber-rich and yummy. Thank you GRANDMA!
Original Muffins
Photo Credit to kelloggs.com
All-Bran Muffins
Makes 12 muffins
1 1/2 cup Kellog's All-Bran Cereal
1 1/4 cup milk
1 egg
1/4 cup vegetable oil
1/2 cup sugar
1 1/4 cup flour
1 tablespoon baking powder
1/4 teaspoon salt

Heat oven to 400. In large bowl, pour milk & cereal, let soak for about 10 minutes.

In small bowl, combine flour, sugar, salt & baking powder. Add egg and oil to cereal; beat well. Add dry mixture and stir only until combined. Pour into muffin tins. Bake 18-20 minutes.

Recipe Source: Grandma Schwartz adapted from Kellogg's

Peanut Butter Silk Cake

Peanut Butter Silk Cake
Photo Credit to bettycrocker.com
This was one of my first attempts at anything but a 9x13 shaped cake. I know, it was a few years ago. But I've made it a couple more times, because it is SO good. (Of course you know how partial I am to peanut butter) It's moist, delicious and heavenly. Sometimes I judge Betty Crocker...sorry Betty. I'm not even sure why, maybe I think they're too easy (because I'm dumb enough to want "challenging" recipes), or maybe I don't like them because I like to make everything from scratch (yeah, that dumb thing in me again). Anyway...this is a recipe that proves me wrong. Try it.

Peanut Butter Silk Cake
1 box yellow cake mix
1 1/4 cups water
1/2 cup creamy peanut butter
1/3 cup vegetable oil
3 eggs
1/4 cup butter or margarine
1/4 cup packed brown sugar
1 cup whipping cream
1/2 cup creamy peanut butter
1 container (1 lb) chocolate frosting (or one recipe chocolate frosting...still haven't found one I love)
1 cup chopped peanuts, if desired

Heat oven to 350°F (or 325°F for dark or nonstick pans). Generously grease bottoms only of 2 (8- or 9-inch) round cake pans with shortening or cooking spray.
In large bowl, beat cake mix, water, 1/2 cup peanut butter, the oil and eggs with electric mixer on low speed 30 seconds. Beat on medium speed 2 minutes, scraping bowl occasionally. Pour into pans.
Bake 30 to 35 minutes or until toothpick inserted in center comes out clean. Cool 10 minutes. Run knife around sides of pans to loosen cakes; remove from pans to cooling rack. Cool completely, about 1 hour.
In 2-quart saucepan, melt butter over medium heat; stir in brown sugar. Heat to boiling; boil and stir 1 minute. Remove from heat. Refrigerate 10 minutes.
In chilled medium bowl, beat whipping cream on high speed until soft peaks form; set aside. In another medium bowl, beat 1/2 cup peanut butter and the brown sugar mixture on medium speed until smooth and creamy. Add whipped cream to peanut butter mixture; beat on medium speed until mixture is smooth and creamy.
Split each cake layer horizontally to make 2 layers. Fill each layer with about 2/3 cup peanut butter mixture to within 1/2 inch of edge. Frost side and top of cake with frosting. Press peanuts onto frosting on side of cake. Store covered in refrigerator.

Note: I like a little more peanut butter filling, so I double that part of the recipe, then add whatever I feel like. And whatever I have left over...I might eat the extra on its own...

Recipe Source: Adapted from Betty Crocker

Saturday, December 8, 2012

{Overnight} Breakfast Enchiladas

Photo Credit to Shelbi Keith
Easy, delicious breakfast recipes are few and far between. This one is awesome. Maybe not the healthiest because of all the cheese, but SO delicious.

Breakfast Enchiladas
2 cups Cubed, Cooked Ham
½ cups Chopped Green Onions
2-½ cups Shredded Cheddar Cheese, Divided
10 whole Flour Tortillas
2 cups Half-and-half
6 whole Eggs
1 tablespoon Flour
Salsa, To Serve

Prep this the night before and cook in the morning.

Stir together ham, green onions and 2 cups of cheese. Use a 1/3-cup measuring cup to scoop out cheese mixture onto a tortilla. Roll up tortilla and place seam side down in a 9 x 13 inch baking dish. Roll up all tortillas and squeeze them into the baking dish.

Whisk together half-and-half, eggs and flour. Pour over tortillas. Cover and let sit overnight.

In the morning, preheat oven to 350ºF. Bake for 30-40 minutes. Remove and sprinkle remaining 1/2 cup of cheese over enchiladas. Bake for 10 more minutes. Serve with salsa.

Recipe Source: Tasty Kitchen

Pumpkin Cheesecake Trifles

There are quite a lot of cheesecake recipes on this website. Yeah, rock it. I love me some cheesecakes. Especially little trifle ones, perfect little portions {that you can have two of}. And I have been ridiculously obsessed with pumpkin this season, but I don't hear any complaining...
Photo Credit to mybakingaddiction.com
Pumpkin Cheesecake Trifles
Makes 4-6 Servings
12 Gingersnaps/Graham crackers, crushed
1 tablespoon unsalted butter, melted
8 ounces cream cheese, softened
1 cup pure pumpkin puree
1 teaspoon pure vanilla extract
1/2 cup sugar
2 teaspoons pumpkin pie spice
1 large tub (12 oz.) whipped topping (Cool Whip), thawed, divided

In a medium bowl, combine cookie crumbs and butter. Divide the crumbs into the bottoms of your trifle glasses. Gently press crumbs to form an even layer of crust.

In a large bowl with an electric mixer, beat cream cheese until smooth. Add pumpkin, vanilla, sugar and pumpkin pie spice. Beat until well combined and creamy.Use a spatula to fold in half of the whipped topping. Gently combine ingredients until no streaks remain.

To Assemble the Trifles: Pipe or spoon a layer of pumpkin cheesecake onto the Biscoff crust followed by a layer of whipped topping. Repeat layers until your trifle reaches the top of your glass or jar.

Store trifles in the refrigerator until ready to serve. If desired, garnish with cookie crumbs.

Note: When I made this the first time, I used little plastic cups from Ikea, and it worked wonders.

Recipe Source: Adapted from My Baking Addiction

Pumpkin Cinnamon Roll Sheet Cake

I got this ready in about 10 minutes. Completely. Awesome, right? I love that you don't have to soften butter. Sometimes I decide I want a dessert, and I have about 30 minutes to make and eat it. This was awesome. More moist than I could have imagined. And it was so delicious! We ate a lot of pieces in a little...a very little! Try it.
Photo Credit to picky-palate.com
Pumpkin Cinnamon Roll Sheet Cake
Makes 16-20 pieces1 box yellow cake mix
4 eggs
1/2 cup canola or vegetable oil
1/2 cup milk or buttermilk
3.4 ounce box Vanilla Instant Pudding Mix
1/2 cup sour cream
15 ounce can pumpkin
1 stick (8 tablespoons) unsalted butter
3/4 cup packed light brown sugar
1/2 teaspoon ground cinnamon
3/4 cups powdered sugar
1/4-1/2 cup heavy cream (start w 1/4 cup and add a little more cream if needed)

Preheat oven to 350 degrees F. and spray a jelly roll pan with non stick cooking spray.

Place cake mix, eggs, oil, milk, pudding, sour cream and pumpkin into a stand or electric mixer, beating until well combined, about 1 1/2 minutes. Pour into prepared pan, spreading evenly.

Place butter into a microwave safe bowl and melt, about 30-40 seconds. Add brown sugar and cinnamon to bowl, mixing until combined. Drizzle mixture evenly over cake then take a knife and run it through to swirl.

Bake cake for 30-35 minutes, until cooked through and remove. Place powdered sugar and cream into a large bowl and mix until creamy and smooth. Drizzle over warm cake then let cool for 20 minutes before cutting into squares. Refrigerate if not serving same day. Enjoy with milk!
Recipe Source: Picky Palate

Apple-Cream Cheese Bundt Cake

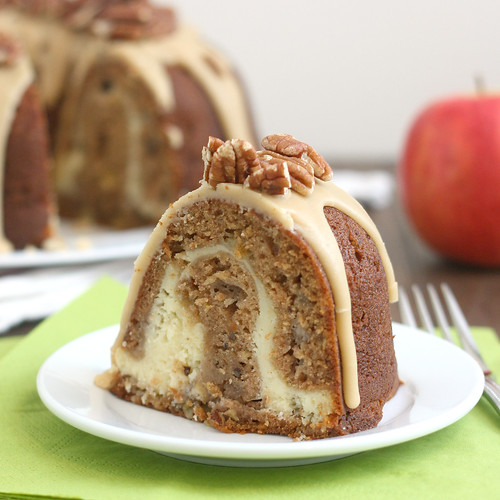
Bundt cakes are ridiculously scrumptious. I love their rich, denseness. I sometimes look up bundt cakes because that's what I feel like {which I also feel like is a little weird...} no matter the flavor. This one is a definite winner. I love cream cheese in anything and little different texture from the apples makes this a favorite bundt.
Apple-Cream Cheese Bundt Cake
Photo Credit to bakedbyrachel.com
Apple-Cream Cheese Bundt Cake
Cream Cheese Filling
1 (8-oz) package cream cheese, softened
1/4 cup (4 tablespoons) unsalted butter, at room temperature
1/2 cup granulated sugar
1 large egg, at room temperature
2 tablespoons all-purpose flour
1 teaspoon vanilla extract

Cake
1 cup finely chopped pecans (plus extra for garnish, optional)
3 cups all-purpose flour
1 cup granulated sugar
1 cup packed light brown sugar
2 teaspoons ground cinnamon
1 teaspoon salt
1 teaspoon baking soda
1 teaspoon ground nutmeg
1/2 teaspoon ground allspice
3 large eggs, lightly beaten
3/4 cup canola oil
3/4 cup unsweetened applesauce
1 teaspoon vanilla extract
3 cups peeled and finely chopped Gala apples (about 2-3 medium apples)

Praline Frosting
1/2 cup packed light brown sugar
1/4 cup (4 tablespoons) unsalted butter
3 tablespoons milk
1 teaspoon vanilla extract
1 cup confectioners’ sugar

Preheat oven to 350 F. Spray a 12 or 14 cup bundt pan with nonstick cooking spray with
flour (the cake will fit in a 12-cup bundt, but just barely).

To make the filling: Add the cream cheese, butter and sugar to the bowl of a stand mixer
fitted with the paddle attachment. Beat on medium speed until well combined and
smooth. Add the egg, flour and vanilla and continue beating just until incorporated. Set
aside.

Place the pecans on a rimmed baking sheet and toaste in the oven for 8-10 minutes, or
just until fragrant. Remove the pan to a wire rack.

In a large bowl, whisk the flour, both sugars, the cinnamon, salt, baking soda, nutmeg and
allspice together. Add the eggs, oil, applesauce and vanilla and mix just until combined
(I started with a whisk and switched to a rubber spatula). Fold in the toasted pecans and
chopped apples until distributed throughout the batter.

Spoon about 1/2 to 2/3 of the cake batter into the prepared pan. Top evenly with the
cream cheese filling, leaving a 1-inch border around the edge of the pan (I found this
tricky, just do the best you can). Use a thin paring knife to swirl the cream cheese filling
with the cake batter just a few times – less is more. Top the filling with the remaining
cake batter.

Bake for 60-75 minutes, or until a thin knife inserted in the center of the cake comes out
clean. Transfer the pan to a wire rack and cool for 15 minutes, then invert the cake onto
the rack and allow to cool completely (at least 2 hours).

To make the frosting: Combine the brown sugar, butter and milk in a 2-qt saucepan. Set
over medium heat, and bring to a boil, whisking almost constantly. Boil for 1 minute,
whisking constantly. Remove the pan from the heat and stir in the vanilla. Whisk in the
confectioners’ sugar, a little at a time, until it is completely incorporated and the frosting
is smooth. Gently stir the frosting until it starts to thicken, then pour it over the cooled
cake. (The frosting will set up quickly, so don’t make it in advance – wait until the cake
has cooled completely.) Garnish with extra pecans, if desired.

Recipe Source: Baked by Rachel 

{Perfect} Classic Pancakes

I have tried a lot of pancakes. These were the best I have tried. According to myself...and my husband. So, yeah for sure, it's a winner!
Photo Credit to thesisterscafe.com
Classic Pancakes
2 eggs, separated
2 c. milk
½ c. oil
2 c. flour
1 Tb baking powder
1 tsp salt
1 Tb sugar

Beat egg whites until stiff; set aside. Combine yolks, milk and oil. Stir together flour, baking powder, salt and sugar and add to yolk and milk mixture; mix well. Fold in the egg whites gently with a spoon so you can still see streaks of the whites in the batter. Scoop onto hot griddle (around 275° works well for me) using a large soup spoon. (Each pancake should only be a few tablespoons of batter.) Flip when bubbles pop on the top, or when pancake is golden underneath.

Recipe Source: The Sister's Cafe

{Healthy} Banana Blueberry Muffins

I have been obsessed with muffins lately. And I love Bananas and blueberries together, so this is a perfect combination for breakfast!
Photo Credit to melskitchencafe.com
Banana Blueberry Muffins
Makes 12 muffins1/4 cup (4 tablespoons) butter, room temperature
1/4 cup plain yogurt
1/3 cup granulated sugar
1/3 cup packed light brown sugar
2 large eggs
1 3/4 cups whole wheat flour
1/4 cups quick or regular oats
1 teaspoon baking soda
1/2 teaspoon salt
2 ripe bananas, lightly mashed
1/3 cup milk
1 teaspoon vanilla extract
1 cup frozen blueberries
2 teaspoons flour

Preheat the oven to 375 degrees F. Lightly grease a 12-cup muffin tin with cooking spray. Set aside.

In a large bowl (or the bowl of an electric stand mixer), beat together the butter, yogurt and sugars until the mixture is light and fluffy. Add the eggs and beat well. In a blender or food processor, process the oats until they are finely ground. Add the wheat flour, baking soda and salt and pulse one or two times until the dry ingredients are lightly combined. Pour the dry mixture into the wet mixture and mix until just combined. Mix in the lightly mashed bananas. Stir in the milk and vanilla. Toss the blueberries with the 2 teaspoons flour and then gently fold them into the muffin batter. Divide the batter evenly among the 12 muffin cups. Bake for 20-22 minutes or until a toothpick inserted in the center comes out clean (watch the muffins carefully since each oven may vary slightly in temperature affecting exact baking time). Let the muffins rest in the pan for about 5 minutes and then turn out onto a wire rack to cool completely.

Recipe Source: Mel's Kitchen Cafe

Cookie Reese's Brownies

Okay, I'm a pinterest nut. It has brought me too many recipes to make, but I sure try my best. This is one of those "I don't really know where it comes from, but I'm going to make it and share it because DANG!" It was quite sugary, but not too much. I even had two! And they were approved by my entire family. Have at it.
Pinned Image
Photo Credit to Megan Balaban
Cookie Reese's Brownies
Cookie Dough {I used this recipe}
12 Reese's peanut butter cups {more, if you're making more...}
Box brownie mix, prepared

Preheat oven to 350. Refrigerate cookie dough for 30 minutes-1 hour. Smoosh 2-3 ounces cookie dough into the bottom of each well {I used a round muffin tin pan}. Place Reese cup upside down on top of cookie dough. Top with prepared box brownie mix, filling 3/4 full. Bake for 18 minutes! 

Recipe Source: Pinterest

Cookies & Cream Peanut Butter

Remember my obsession with peanut butter? Just another fact to prove that fact. I tried this recipe.
I probably shouldn't have, but you can bet your bottom dollar I'm going to make it again. It added sweet creaminess, and chunky cookies. It is SO good, although very hard to only eat one spoonful at a time...
Photo Credit to picky-palate.com
Cookies & Cream Peanut Butter
10 whole Oreo Cookies{Next time, I'm not going to use fresh cookies so I don't get as big of a crunch}
2 Cups creamy peanut butter
1 cup white chocolate chips
2 tablespoons creamy peanut butter

Crush Oreos into small pieces and place into a large bowl. Add 2 cups peanut butter.
Place white chips and 2 tablespoons peanut butter into a double boiler and stir until melted. Add to bowl of Oreos and peanut butter. Stir just a little so you have a bit of swirls of chocolate throughout. Place peanut butter into a jar or eat from the bowl...

Recipe Source: Adapted from Picky Palate

Peanut Butter Chocolate Deliciousness

The deliciousness part was added by me. Because this is awesome. For real...beyond awesome. It's chocolate/peanut buttery/oreo/puddingly AWESOMENESS. I made it for a friend {who loves PB} on his birthday and we were all blown away. I honestly don't know what else to say. It takes time, but it's so worth it.
Peanut Butter Chocolate Dessert Recipe
Photo Credit to tasteofhome.com
Peanut Butter Chocolate Deliciousness
12-16 Servings
20 chocolate cream-filled chocolate sandwich cookies, divided
2 tablespoons butter, softened
1 package (8 ounces) cream cheese, softened
1/2 cup peanut butter
1-1/2 cups confectioners' sugar, divided
1 carton (16 ounces) frozen whipped topping, thawed, divided
15 miniature peanut butter cups, chopped
1 cup cold milk
1 package (3.9 ounces) instant chocolate fudge pudding mix

Crush 16 cookies; toss with the butter. Press into an ungreased 9-in. square dish; set aside.
In a large bowl, beat the cream cheese, peanut butter and 1 cup confectioners' sugar until smooth. Fold in half of the whipped topping. Spread over crust. Sprinkle with peanut butter cups.
In another large bowl, beat the milk, pudding mix and remaining confectioners' sugar on low speed for 2 minutes. Let stand for 2 minutes or until soft-set. Fold in remaining whipped topping.
Spread over peanut butter cups. Crush remaining cookies; sprinkle over the top. Cover and chill for at least 3 hours.

Recipe Source: Taste of Home

Salsa & Chicken Fettuccine

The other day {which could mean pretty much whenever-two days ago, seven months ago...} I was looking for something fast {not because I was procrastinating or anything...} for dinner, and that I could feed a lot of people {so I doubled it}. This was simple, fast, and yummy, I think partly because of the awesome salsa I used. I helped to can the salsa from the family cannery in Lindon, UT...and it is fantastic.
Salsa and Chicken Fettuccine | Taste and Tell
Photo Credit to tasteandtellblog.com
Salsa & Chicken Fettuccine
Serves 3-4
1/2 pound fettuccine
1/2 cup salsa
1/2 cup sour cream
1/2 cup freshly grated parmesan cheese
1 cup cooked, chopped chicken
chopped fresh cilantro

Bring a large pot of salted water to a boil. Cook pasta until al dente; drain and return to pot.
In a small pot, combine the salsa, sour cream and parmesan. Cook over medium heat until hot. Pour the hot sauce over the cooked fettuccine and stir until coated. Add in the chicken and stir to combine. Serve topped with cilantro.
Recipe Source: Taste & Tell 

S'mores Treats

Did you ever want to add graham crackers to rice krispies? Did you ever want to add graham crackers to anything. I did. Then I found these beauts and it was a wonderful thing! {Although, I have recently wondered if I should try actual graham crackers and not Golden Grahams-let me know if you try it!}
Photo Credit to mrshardingcooks.blogspot.com
S'mores Treats
Makes 9x13 pan1 16 oz. bag mini marshmallows
5 tablespoons butter
¼ c. corn syrup
1 ½ c. milk chocolate chips
1 box golden grahams (about 14 oz.)

Heat butter in large pot on medium until melted. Add marshmallows, corn syrup, and chocolate chips, stirring constantly until melted and gooey. Remove from heat. Quickly pour in box of Golden Grahams and evenly stir and combine. Spread in 9x13 inch pan and enjoy! You can also let them cool and cut into bars.

Friday, December 7, 2012

Squash {or zucchini} Pie

Don't judge me. I had a TON of squash this summer and didn't know what to do with it. Honestly, I found this recipe because I wanted to trick my family with a yummy pie made of squash without them knowing. I had to make it twice for them to even get a piece because we ate it so fast...no lie. It is utterly delicious.
Photo Credit to mangopowergirl.com 
Zucchini {or squash} Cream Pie
Makes one 9" pie
2 cups peeled and chopped zucchini or yellow squash
3 cups water
1 cup evaporated milk
2 cups white sugar
1 egg, beaten
2 tablespoons butter or 2 tablespoons margarine
3 tablespoons flour
1 teaspoon vanilla
1/2 teaspoon cinnamon
1/4 teaspoon nutmeg
1 9 inch pie shell

Cook zucchini in water until tender. Drain then put in refrigerator for 10 minutes. Drain zucchini.
Blend zucchini, evaporated milk, white sugar, egg, butter, flour, vanilla together, pulsing until creamy.
Pour mixture into pie crust and sprinkle with cinnamon and nutmeg.
Bake at 325 for 65 minutes or until a knife comes out clean. {I cooked mine for 90-120, depending on which of the two times in one week I made it}

Recipe Source: Food.com

{No-Bake}Chewy Cookies & Cream Bars

Okay, so I needed a quick dessert because I was making some birthday treats for a neighbor and friend {No, I did not procrastinate and therefore need a no-bake dessert...}. This is a rice krispie treat minus rice krispies plus oreos. Oh my deliciousness. My mouth was dancing.
Photo Credit to picky-palate.com
{No-Bake}Chewy Cookies & Cream Bars
Makes 9 barsOne 16 oz package of Oreo
5 cups Large Marshmallows
4 tablespoons butter

Place Oreos in food processor and pulse until ground. Melt marshmallows and butter in microwave until puffed, about 1 1/2- 2 minutes. Remove and pour in ground Oreo Cookies. Stir to combine then transfer to a foil lined 8×8 inch baking pan. Let set up for 10 minutes. Remove bars out of pan with edges of foil and cut into squares.
Recipe Source: Picky Palate

Peanut Butter Snickers Cookies

Remember how I love peanut butter? I eat it by the spoonful {with or without jam, honey, oreos, bananas, apples, white chocolate, etc}. I love anything that has peanut butter in it. Seriously, I can't remember anything that has had peanut butter in it that I haven't loved. And these are NO exception. These have snickers in them. Snickers are my favorite candy bar. {Okay, it's a tie between them and Reese's}. A friend made these for us for a get together and as soon as I tasted them, I asked for the recipe. Seriously, these are heaven-sent. Make. Them. Now.
Photo Credit to browneyedbaker.com


Peanut Butter Snickers Cookies
Makes about 24 cookies
1¼ cups all-purpose flour
¾ teaspoon baking soda
½ teaspoon baking powder
¼ teaspoon salt
½ cup unsalted butter, softened
1 cup creamy peanut butter
¾ cup granulated sugar
½ cup light brown sugar
1 egg
1 tablespoon milk
1 teaspoon vanilla extract
1½ cups chopped Snickers candy bars (about 4 regular size bars)
¾ cup milk chocolate chips

Preheat oven to 350 degrees F. Line a two baking sheets with parchment paper or silicone baking mats. Set aside.

In a medium bowl, whisk together the flour, baking soda, baking powder, and salt. Set aside.

In the bowl of a stand mixer, beat the butter and the peanut butter together until fluffy. Add the sugars and beat until smooth. Add the egg and mix until combined. Add the milk and the vanilla extract and mix again.

Add the flour mixture and beat until flour disappears. Stir in the chopped Snickers and chocolate chips.

Drop by heaping tablespoons onto the prepared baking sheets. (I weighed mine out to about 2 ounces of dough per cookie.) Gently flatten each cookie ball with the palm of your hand. Bake for 10-11 minutes, or until cookies are slightly brown on the edges.

Cool the cookies on the baking sheets for about 5 to 10 minutes, then remove to a rack to cool completely. Store in an airtight container at room temperature.

Recipe Source: Brown Eyed Baker

Oreo Truffle Brownies

My little sister had this party a few weeks ago. It didn't mean to be a party, it was just a whole bunch of teenagers getting together to "hang." I haven't done that in at least 5 years. I felt like I was part of this party because I was trying to make these beauts. After the awesome party where I felt like I was 17 again {Ha, no reference to the Zac Efron movie...}, I got to eat a pan of these alone {maybe my mom and dad were both there}. It was a nice little break from the real world of having two babies and a husband in a doctorate program...
Photo Credit to melskitchencafe.com
Oreo Truffle Brownies
Makes 9X13-inch pan
1 (12-ounce) bag semisweet chocolate chips
1 cup butter (2 sticks)
1 1/2 cups granulated sugar
1 teaspoon vanilla
4 large eggs
1 1/2 cups flour
1/2 teaspoon salt

26 Oreo or other chocolate-sandwich cookies
8 ounces cream cheese, light or regular, softened
4 ounces white chocolate or white almond bark

For the brownies, preheat oven to 350 degrees. In a medium saucepan over low heat, melt the butter and chocolate chips. Stir constantly and remove from heat when the chocolate is fully melted. In the same pot, whisk in the sugar and vanilla. Then add eggs, blending fully one at a time. Add the flour and salt and stir until well combined. Pour the batter into a greased 9 X 13-inch pan. Bake for 20 minutes. Turn the heat down to 325 degrees and bake for 10 more minutes. Remove from the oven and let the brownies cool completely.

For the Oreo truffle topping, crush the Oreo cookies and mix with the softened cream cheese until the mixture is well-combined. I find the best method is to lightly crush the Oreo cookies and then mix the cookies with the cream cheese in an electric stand mixer, food processor or with a handheld mixer. Lightly press the Oreo truffle mixture over the cooled brownies.

In a small microwave-safe bowl, melt the chocolate or almond bark on low power at 30-second intervals, stirring in between, until melted and smooth. Pour the chocolate into the corner of a ziploc bag. Carefully snip a small piece off the corner and drizzle the chocolate across the brownies. Alternately, you can cut the brownies into squares and then drizzle with the chocolate. Chill the brownies in the refrigerator until the chocolate is set (10-20 minutes). Cut into slices and serve. In my opinion, these brownies taste best chilled but you can also serve them at room temperature.

Note: To be quite honest, I've had one homemade recipe of brownies, and didn't like it much, so when I saw this recipe, I made a box brownie instead of this recipe...and I'm sad I did. It was too sweet. When I do it next time {and there will be a next time}, I will make it with this recipe.

Recipe Source: Mel's Kitchen Cafe

Creamy Green Chile Dip

Never in my life have I made a recipe. I mean, made something up. Slowly but surely, I've "ventured". Not measuring something here, substituting something there...finally, here it is. My very own recipe. Well, the original idea actually came from a jalapeño popper dip from My Baking Addiction, but since I didn't have everything I needed, I improvised a LOT, so I'm calling it my own. It was simple, but yummy, and the everyone at Christmas party I took it to raved and...it only lasted about 8 minutes.

Post image for Jalapeno Popper Dip
Photo Credit to mybakingaddiction.com
Creamy Green Chile Dip
Makes 3 cups{ish}
1 (8 ounce) packages cream cheese, softened
1/2 cup mayonnaise
1 (4 ounce) can chopped green chilies, drained
1/2-3/4 cup shredded Monterey Jack cheese
1 cup Panko bread crumbs
1/2 cup freshly grated parmesan cheese

Preheat oven to 350 degrees and spray an oven safe serving dish with non-stick cooking spray.

Using an electric mixer, blend the cream cheese and mayonnaise until smooth.Stir in green chilies, and Monterey Jack cheeses. Spoon this mixture into the prepared baking dish.

Mix together the Panko and parmesan cheese and sprinkle it over the cream cheese mixture. Spray the Panko and parmesan with a quick spray of non-stick cooking spray.

Bake for 25-30 minutes or until the mixture is hot and the topping is lightly browned.
NOTES:- If you are in a hurry, skip the Panko/Parmesan topping and simply microwave the cream cheese mixture until hot and bubbly {From Jamie at My Baking Addiction}

Recipe Source: Highly adapted from My Baking Addiction

Thursday, December 6, 2012

{Healthy} Bacon, Cheese & Tomato Strata

I never cook bacon. Ok, I cook bacon once a year and go "Darn, why did I cook that! My house smells like bacon for 20 hours!!" Quite surprisingly, I kept this because I wanted to try it. Oh man, aren't I glad I did. Yes, yes I am. It's SO worth the bacon smelling house. Times 10.
Photo Credit to livebetteramerica.com
Bacon, Cheese & Tomato Strata
Makes 9x13 pan
7 cups lightly packed 1-inch cubes French bread (8 oz)
2 cups shredded reduced-fat Cheddar cheese (8 oz)
2 cups chopped plum (Roma) tomatoes (6 medium)
6 eggs or 1 1/2 cups fat-free egg product
1 1/2cups fat-free (skim) milk
1 teaspoon Dijon mustard
1 teaspoon dried basil leaves
1/2 teaspoon salt
6 slices bacon
Spray 13x9-inch (3-quart) glass baking dish with cooking spray. Spread bread in baking dish. Sprinkle evenly with 1 1/2 cups of the cheese; mix lightly with bread. Sprinkle with tomatoes.
In medium bowl, beat eggs, milk, mustard, basil and salt with fork or wire whisk; pour over bread mixture. Cover tightly and refrigerate at least 2 hours but no longer than 24 hours.
Heat oven to 350°F. Bake uncovered 40 to 45 minutes or until knife inserted in center comes out clean. Meanwhile, in 10-inch skillet, cook bacon over medium heat 8 to 10 minutes, turning occasionally, until crisp; drain on paper towel.
Crumble bacon. Sprinkle bacon and remaining 1/2 cup cheese over strata. Let stand 10 minutes before serving.

Peach Smoothie

My mom loves us so so much and got us a Blendtec for our birthdays {yes, ours}. We have LOVED it and use it all the time. I found this recipe forever ago and kept it for who-knows-what reason, but now...I'm so glad I did! It was yummy and healthy!
Photo Credit to prevention.com

Peach Smoothie
6 cups
2 cups ice
2 peaches, pitted and cut in pieces
3/4 skim milk {or 1%}
1 container {or about a cup} of plain greek yogurt {I used vanilla}
1/2 cup orange juice
3 tablespoons honey

Put all ingredients but honey in blender and blend. While blending, add honey.
Pour into glasses and serve.

Recipe Source: Magazine that was sitting in my dental office {picked up about 4 years ago}

Apple Puff Up Pancake

Oh, hey. An easy, yummy twist on German pancakes. Loved these. But you have to like German pancakes...obviously.
Photo Credit to stringsandyarn.com

Apple Puff-Up Pancakes
4-6 servings
1 large apple-peeled, cored, chopped
3 large eggs
1/2 cup milk
1/2 cup flour
1/4 teaspoon vanilla
2 tablespoon margarine
1/4 cup brown sugar
1/4 teaspoon cinnamon
lemon juice
powdered sugar

Preheat oven to 450. Whisk eggs-vanilla together. Cook apples in margarine in pan, then sprinkle brown sugar & cinnamon over apples. Take off heat and put in 8x8 pan. Pour batter over apples and bake for 15 minutes. Sprinkle with lemon juice and powdered sugar.

Recipe Source: Adapted from Sharrie Webster

{Healthy} Creamy Chicken Enchiladas

Although I put a lot of unhealthy, fatty, delicious recipes up here {no, I'm not apologizing}, But this is healthy delicious. I know, awesome right. I get a free calendar every year from livebetteramerica.com and I love it, I get to make a new {healthy} recipe every month! 
Healthified Creamy Chicken Enchiladas
Photo Credit to livebetteramerica.com
Creamy Chicken Enchiladas
Makes 9x13 pan
1 tablespoon olive oil
1/2 cup chopped onion {1 medium}
2 teaspoons finely chopped garlic
2 cups chicken broth
3 tablespoons all-purpose flour
1/2 teaspoon ground coriander or cumin
1/8 teaspoon pepper
1/2 cup reduced-fat sour cream
2 cups shredded cooked chicken breast
1 cup frozen corn, thawed {or canned}
1 cup shredded reduced-fat Mexican cheese blend
1 can (4 oz) chopped green chiles
1/4 cup chopped fresh cilantro
8 corn or flour tortillas
1 medium tomato, chopped (3/4 cup)
4 medium green onions, sliced (1/4 cup)
Salsa, if desired

Heat oven to 350°F. Spray 13x9-inch (3-quart) glass baking dish with cooking spray.
In 10-inch nonstick skillet, heat oil over medium heat. Add onion and garlic; cook 3 to 4 minutes, stirring occasionally, until onion is tender. In medium bowl, stir broth, flour, coriander and pepper with wire whisk until blended. Slowly add to hot mixture in skillet, stirring constantly. Cook and stir 5 to 6 minutes, until mixture boils and thickens slightly. Remove from heat. Stir in sour cream until well blended.
In another medium bowl, mix chicken, corn, 1/2 cup of the cheese, the chiles, cilantro and 1/2 cup of the sauce. Place 2 tortillas at a time on microwavable plate; cover with paper towel. Microwave on High 10 to 15 seconds or until softened. Spoon about 1/3 cup chicken mixture down center of each warm tortilla. Roll up tortillas; arrange, seam sides down, in baking dish. Top enchiladas with remaining sauce. Cover with foil.
Bake 30 to 35 minutes or until sauce is bubbly. Remove from oven. Uncover; sprinkle with remaining 1/2 cup cheese. Let stand 5 minutes before serving. Just before serving, top with tomato and green onions. Serve with salsa.

Recipe Source: Live Better America

{Raspberry} Ice cream

I might have explained this previously, but...here we go.
All growing up, there were a lot of things {cranberry sauce, bread, ICE CREAM} that I know were impossible to make at home. The store ordered them and that was it, there was no possible way in this world for these things to be made at home. Then I married Scott and met his mom. I have slowly learned how wrong I was! And I'm so grateful, because my life in taste buds has become so much better.
So, the first ice cream recipe I attempted...{and the one that I keep going back to after trying 4 others...} is from my mother-in-law and is originally supposed to be made with raspberries, but I've tried it with other fruits, and with vanilla {using a little sugar}, and it has turned out awesome.
Photo Credit to The Pretty Life Anonymous
{Raspberry} Ice Cream
4 cups sugar {only 3 if you do vanilla}
1 cup sour cream
5 teaspoons vanilla
6 eggs
1 can evaporated milk
1 quart cream
20 oz thawed raspberries {or any other fruit you want to try}

Mix everything except the peaches {nts: mix in ginormous red bowl}. Place in fridge and allow to chill for 30{ish} minutes. Mash fruit {unless you like frozen chunks in your ice cream} then coat in a couple tablespoons of sugar. Put Mixture into ice cream maker and turn it on. when it's thickening, add the peaches, then let it finish. Enjoy!

Note: I usually half the recipe because I'm too lazy to do four batches in our little ice cream maker.

Recipe Source: Slightly adapted from Sharrie Webster

Mom's Zucchini Bread

There are some recipes that are made because they're healthy and scrumptious. This is not one of those. It is carb-loaded and is more like a dense cake than anything. But if you think that my mom doesn't get at least 8 requests for these every summer/fall, you're crazy! This bread is so delicious and I have yet to find another recipe that rivals it. So...you're welcome. And oh...thanks Mom.
Photo Credit to smittenkitchen.com
Zucchini Bread
Makes 2 loaves
3 eggs
1 cup oil
2 cups sugar
1 Tbsp vanilla
2 cups peeled & grated zucchini {I'm too lazy to peel mine}
3 cups flour
1 tsp cinnamon
1 tsp baking soda
1 tsp salt
1/4 tsp baking powder

{Doesn't get any simpler...} Mix all ingredients up to and including zucchini together. Mix dry ingredients in a separate bowl, then add them to the wet ingredients. Bake for one hour at 325 degrees.

Recipe Source: My sweet Mother

Tuesday, October 30, 2012

(ATK) Boston Cream Pie

Okay. Whenever you have some time (like lots of time), make this because it is delicious. So freaking delicious. Especially the creamy inside with the deep dark chocolate and the fluffy cake...yeah, heaven, that's right.
I'm much more of a decadent dessert lover than anyone else in my family...so this was awesome!
bostoncreampie
Photo Credit to americastestkitchenfeed.com
Boston Cream Pie
Serves 8-10
Pastry Cream:
2 cups half-and-half
6 large egg yolks
1/2 cup sugar
pinch salt
1/4 cup all-purpose flour
4 tablespoons butter, cut into 4 and chilled
1 1/2 teaspoons vanilla extract
Cake:
1 1/2 cups all-purpose flour
1 1/2 teaspoons baking powder
3/4 teaspoon salt
3/4 cup whole milk
6 tablespoons unsalted butter
1 1/2 teaspoons vanilla extract
3 large eggs
1 1/2 cups sugar
Glaze:
1/2 cup heavy cream
2 tablespoons light corn syrup
4 ounces bittersweet chocolate

For the Pastry Cream: Heat half-and-half in medium saucepan over medium heat until just simmering. Meanwhile, whisk yolks, sugar, and salt in medium bowl until smooth. Add flour to yolk mixture and whisk until incorporated. Remove half-and-half from heat and, whisking constantly, slowly add ½ cup to yolk mixture to temper. Whisking constantly, return tempered yolk mixture to half-and-half in saucepan.

Return saucepan to medium heat and cook, whisking constantly, until mixture thickens slightly, about 1 minute. Reduce heat to medium-low and continue to simmer, whisking constantly, 8 minutes.

Increase heat to medium and cook, whisking vigorously, until bubbles burst on surface, 1 to 2 minutes. Remove saucepan from heat; whisk in butter and vanilla until butter is melted and incorporated. Strain pastry cream through fine-mesh strainer set over medium bowl. Press lightly greased parchment paper directly on surface and refrigerate until set, at least 2 hours and up to 24 hours.


For the Cake: Adjust oven rack to middle position and heat oven to 325 degrees. Lightly grease two 9-inch round cake pans with nonstick cooking spray and line with parchment. Whisk flour, baking powder, and salt together in medium bowl. Heat milk and butter in small saucepan over low heat until butter is melted. Remove from heat, add vanilla, and cover to keep warm.


In stand mixer fitted with whisk attachment, whip eggs and sugar at high speed until light and airy, about 5 minutes. Remove mixer bowl from stand. Add hot milk mixture and whisk by hand until incorporated. Add dry ingredients and whisk until incorporated.

Working quickly, divide batter evenly between prepared pans. Bake until tops are light brown and toothpick inserted in center of cakes comes out clean, 20 to 22 minutes.

Transfer cakes to wire rack and cool -completely in pan, about 2 hours. Run small plastic knife around edge of pans, then invert cakes onto wire rack. Carefully remove parchment, then reinvert cakes.

To Assemble: Place one cake round on large plate. Whisk pastry cream briefly, then spoon onto center of cake. Using offset spatula, spread evenly to cake edge. Place second layer on pastry cream, bottom side up, making sure layers line up properly. Press lightly on top of cake to level. Refrigerate cake while preparing glaze.

For the Glaze: Bring cream and corn syrup to simmer in small saucepan over medium heat. Remove from heat and add chocolate. Whisk gently until smooth, 30 seconds. Let stand, whisking occasionally, until thickened slightly, about 5 minutes.

Pour glaze onto center of cake. Use offset spatula to spread glaze to edge of cake, letting excess drip decoratively down sides. Chill finished cake 3 hours before slicing. Cake may be made up to 24 hours before serving.

Recipe Source: America's Test Kitchen

Sunday, October 14, 2012

(ATK) Easier Fried Chicken

This is delicious. Fourteen hundred pans, a lot of time, but so freaking delicious! It made me feel like I was a little bit healthier, too because they're baked, but they aren't really. Worth it though! Please enjoy!
Photo credit to americastestkitchen.com
Easier Fried Chicken
Serves 4-6
1 1/4 cups buttermilk
salt & pepper
Hot sauce
1 teaspoon garlic powder
1 teaspoon paprika
1/4 teaspoon cayenne pepper
3 1/2 pounds bone in chicken pieces, trimmed
2 cups all-purpose flour
2 teaspoons baking powder
1 3/4 cups peanut or vegetable oil

Whisk 1 cup buttermilk, 1 tablespoon salt, 1 teaspoon pepper, dash hot sauce, 1/4 teaspoon garlic powder, 1/4 teaspoon paprika, and pinch cayenne together in large bowl. Add chicken and turn to coat. Refrigerate, covered, for at least 1 hour or up to 24 hours.
Adjust oven rack to middle position and heat oven to 400 degrees. Whisk flour, baking powder, 2 teaspoons pepper, 1 teaspoon salt, remaining 3/4 teaspoon paprika and remaining cayenne together in large bowl. Add remaining 1/4 cup buttermilk and mix with fingers until combined and small clumps form. Working with 1 piece at a time, dredge chicken pieces in flour mixture, pressing mixture onto pieces to form thick, even coating. Place dredged chicken on large plate, skin side up.
Heat oil in 11" straight-sided sauté pan over medium-high heat to 375 degrees {good luck! I just guessed!} Carefully place chicken pieces in pan, skin side down, and cook until golden brown on second side 2-4 minutes longer. Transfer chicken to wire rack set inside rimmed baking sheet. Bake chicken until breasts register 160 degrees and legs/thighs register 175 degrees, 15-20 minutes.
Remove and eat and try not to eat it all at once. 

Saturday, October 13, 2012

(ATK) Asparagus Gratin

Another America's Test Kitchen recipe. Again, not quick, and it creates a big mess, but so delicious!! Great for a side dish! Beautiful and elegant.
Asparagus Gratin
Photo Credit to americastestkitchen.com
Asparagus Gratin
Serves 8
2 pounds thin asparagus
2 1/2 cups water
salt and pepper
2 tablespoons unsalted butter
2 tablespoons all-purpose flour
2 ounces (1/2 cup) Monterey Jack cheese, shredded
1 1/2 ounces (3/4 cup) Parmesan cheese, grated

Adjust oven rack to upper-middle position and heat broiler. Line broiler-safe baking dish with paper towels. Trim 1 1/2 inches from stem end of asparagus and reserve ends. Bring water to boil in 12-inch skillet over medium-high heat. Add asparagus ends and 1/4 teaspoon salt and cook, covered, for 5 minutes. Using slotted spoon, remove asparagus ends and discard. Add asparagus stalks to skillet, cover, and cook, stirring occasionally, until nearly tender, 2-4 minutes. Transfer asparagus to paper towel-lined baking dish. Pour asparagus water into liquid measuring cup; reserve 1 cup.
Melt butter in now-empty skillet over medium heat. Add flour and cook, stirring constantly, until golden, about one minute. Whisk in reserved asparagus water and bring to boil. Reduce heat to medium-low and simmer until thickened, 3-5 minutes. Off heat, whisk in Monterey Jack and 1/2 cup Parmesan until smooth. Season with salt and pepper to taste. Cover and let stand for 5 minutes.

(ATK) Fish Cakes

We borrowed a cookbook from our neighbors, the Buchanons. Thank you!! Holy cow, I am in love with this cookbook for lots of different recipes. This is one of them, delicious! Just a warning, any recipe that comes from this cookbook is NOT easy. Or quick...but sometimes, you just need a ridiculous recipe that is SO yummy! This doesn't take a ton of time, but it takes a little planning because you have to let the cakes refrigerate for a little while.
Photo Credit to mycolumbianrecipes.com

Fish Cakes
Serves 4
1 pound cod fillets, cut into 1" pieces
1/4 cup plain bread crumbs
1 large egg white
1 shallot, minced
3 tablespoons minced fresh parsley
2 tablespoons light mayonnaise
4 teaspoons Dijon mustard
1 tablespoon lemon juice
1/4 teaspoon salt
1/4 teaspoon pepper
1/4 cup flour
Lemon wedges

Pulse half of cod fillets in food processor until they form mix of equal parts finely minced and coarsely chopped pieces, about 4 pulses. Transfer processed cod to large bowl and repeat with remaining cod. Sprinkle bread crumbs over fish.
Whisk egg white, shallot, parsley, mayonnaise, mustard, lemon juice, salt, and pepper together in bowl. Using rubber spatula, gently fold mixture into cod and bread crumbs until mixture just holds together.
Divide cod mixture into 4 equal portions and shape each into round cake, about 3 inches across and 1.5 inches high. Transfer to plate, cover with plastic wrap and refrigerate for at least 30 minutes or up to 24 hours.
Spread flour in shallow dish or pie plate. Dredge fish cakes in flour, shaking off excess. Heat oil in 12-inch nonstick skillet over medium-high heat until shimmering. Carefully lay chilled fish cakes in skillet and cook until well browned on both sides, 8-10 minutes, flipping them halfway through cooking. Carefully transfer fish cakes to platter and serve with lemon wedges.

Saturday, September 29, 2012

Chocolate Shortcakes with Bananas and Caramel

Hey hey hey. Long time no...virtual interaction...(because I'm convinced that I have hundreds of devout readers who just don't comment...)
I have been making treats a lot, and cooking dinner a little (which is pretty normal). So, gear up for a whole bunch of ridiculously delicious desserts that have been tried and tested! First up...
Photo Credit to ourbestbites.com
 This little beauty. W.o.w. I was a little skeptical because of the caramel/banana/chocolate thing for some reason
Chocolate Shortcakes with Bananas and Caramel  
Makes 8 pieces
1 1/2 cups all-purpose flour (about 6 3/4 ounces)
1/2 cup sugar
1/3 cup unsweetened cocoa
1 teaspoon baking soda
1/2 teaspoon baking powder
1/4 teaspoon salt
1/4 cup chilled butter, cut into small pieces
1/2 cup fat-free buttermilk
FILLING:
Fat free caramel topping
1 cup frozen reduced-calorie whipped topping, thawed
1/8 tsp. unsweetened cocoa powder, optional {I left it out}
2 medium bananas, peeled and cut into 1/4-inch-thick slices (about 2 cups)

Preheat oven to 375°. 
To prepare the shortcakes, lightly spoon flour into dry measuring cups; level with a knife. Combine flour, sugar, unsweetened cocoa, baking soda, baking powder, and salt in a large bowl, stirring with a whisk. Cut in 1/4 cup butter with a pastry blender or 2 knives until mixture resembles coarse meal. Add buttermilk; stir just until moist. Knead lightly in bowl 5 to 6 times. Turn dough out onto a lightly floured surface; pat dough into an 8-inch circle on a baking sheet lined with parchment paper. Cut dough into 8 wedges, cutting into, but not through, dough.

Recipe Source: Our Best Bites

Friday, August 24, 2012

Strawberry-Banana Trifle

I made this once, and it was a...home...run! Seriously, it's not too heavy, and made with fruit {Which makes it healthier, right}, and it makes a TON! Try it and you won't be disappointed. {PS...Mallory's favorite}
Strawberry-Banana Trifle
Photo credit to recipe.com
Strawberry-Banana Trifle
2 bananas, peeled
3 egg whites
2 tablespoons oil
1 box (18.25 ounces) white cake mix
Filling and Fruit:
2 boxes (3 ounces each) cook-and-serve vanilla or banana pudding mix {I used instant!}
3-1/2 cups milk
2 bananas, peeled and sliced
2 cups sliced strawberries, plus more for garnish
1 cup heavy cream, whipped with
1 tablespoon sugar

Heat oven to 350 degree F. Line a 13 x 9 x 2-inch baking pan with nonstick foil. Set aside.

Cake: In a mixer, combine 1-1/3 cups water, the bananas, egg whites and oil. Mix until mostly smooth, about 2 minutes. Add cake mix. Beat on low speed for 30 seconds, then increase speed to high and beat 2 minutes. Pour into prepared pan and bake at 350 degree F for 33 to 35 minutes.

Cool cake in pan on a wire rack for 15 minutes, then, using foil, lift cake from pan and cool completely.

Filling and Fruit: Meanwhile, cook pudding mix with milk for 15 to 20 minutes over medium heat, until thickened and bubbly. Transfer to a bowl and refrigerate 30 minutes. {or just make instant}

Trim edges from cooled cake. Cut in half, then cut one half into cubes (about 20). Place in a trifle dish or bowl and press slightly to compress. Spoon 2 cups pudding over cake. Top with 1 sliced banana and 1 cup of the sliced strawberries. Cut second cake half into cubes and continue layering cake, pudding, bananas and strawberries. Top with heavy cream. Refrigerate at least 3 hours or overnight. {The longer, the better}

Recipe Source: Slightly adapted from Recipe.com

Peanut Butter "Eggs"

So, it's no secret that I love peanut butter. You can ask my roommates with whom I used to eat spoonfuls of peanut butter and jam/honey. Or my mother in law who gave me a huge jar of peanut butter before we even got married.
I love reese's "eggs" more than any other type of reese's. They are greasy and delicious. And these homemade ones were ridiculously close.
DSC_0343
Photo credit to thewhimsicalprincess.blogspot.com
The Whimsical Princess’s Chocolate Peanut Butter Eggs

4 cups powdered sugar
1 1/2 cups Creamy Peanut butter
1/4 cup butter or margarine, melted
2-3 tablespoons milk
3 cups semisweet chocolate chips{We used milk and I'm sure it would be just as good with semisweet}
1 tablespoon Shortening

Mix together the powdered sugar, peanut butter, and butter. Add the milk one tablespoon at a time until it becomes a nice workable dough{I didn't add any milk, it was perfect}. It will be just like play dough, it will be really easy to work with. Form the dough into egg shapes, and place in the freezer for about an hour.

Place the chocolate chips and shortening in a glass measuring cup. Microwave 1 minute at a time stirring in between until completely melted.

Dip each egg in the melted chocolate and place on waxed paper until set. (I use a skewer and then slide the dipped egg of and cover the hole)

Once they are set you can trim any excess chocolate off that may pool at the base with a pairing knife to make them look pretty. You could also decorate them with royal icing and make a really special Easter treat.

Recipe Source: The Whimsical Princess

Loaded PB Cup Chocolate Cookies


Sometimes...you just need a cookie with tons of chocolate, peanut butter, and fat. This is that cookie. So heavy, and SO delicious. The cookie dough was awesome, too.
Photo credit to melskitchencafe.com
Loaded Peanut Butter Cup Chocolate Cookies
Makes about 36 cookies.
1 cup butter, softened
3/4 cup peanut butter
3/4 cup white sugar
3/4 cup packed brown sugar
2 eggs
1 teaspoon vanilla extract
2 1/3 cups all-purpose flour
1/3 cup cocoa powder
1 teaspoon baking soda
1 cup semisweet chocolate chips
1 cup peanut butter chips
1 cup Reese’s Pieces {I didn't use these and it was still awesome}
1 package mini Reese’s peanut butter cups, cut into halves and frozen (the original recipe says to freeze the cups and then cut them into halves but I had major issues with this – when I froze them whole and then tried to cut them, it was a disaster – the mini cups broke into a million pieces, so my suggestion would be to gently cut them into halves and THEN freeze them)

Preheat oven to 350 degrees.

In a large bowl or stand mixer, cream together the butter, peanut butter, white sugar, and brown sugar until smooth. Beat in the eggs one at a time, then stir in the vanilla. Combine the flour, cocoa, and baking soda; stir into the peanut butter mixture. Mix in the chocolate chips, peanut butter chips, and Reese’s Pieces (this is best done by hand so the shells of the Reese’s Pieces don’t get broken).

Drop by tablespoonfuls onto cookie sheets lined with parchment paper or silpat liner. Push one peanut butter cup half into the center of each ball of dough. Bake for 8 to 10 minutes (I baked mine about 11 minutes). Let cool for 1 or 2 minutes on sheet before removing, or they will fall apart.

{Then devour and try hard to not gain 15 pounds on the spot.}

Recipe Source: Mel's Kitchen Cafe

Peach Crisp

Simple and delicious desserts are my favorite. Less time baking, more time eating yummy!
Crisps are awesome because you get hot/cold and sweet/tangy all at the same time. Perf!
Photo credit to mrshardingcooks.blogspot.com
Peach Crisp
6-8 medium peaches, peeled and sliced into thin slices
2-3 tablespoons sugar
1 teaspoon lemon zest (or a few drops of lemon juice will do)
1 tablespoon cornstarch
1 cup white flour
1 cup old fashioned rolled oats, uncooked
1 cup packed brown sugar
2 teaspoons cinnamon
8 tablespoons slightly softened butter

Preheat oven to 375 degrees. In a large mixing bowl, mix first 4 ingredients until blended thoroughly. Spray a 2.5 qt baking dish with cooking spray and add peaches. Cook in the oven for 20 minutes.

While the fruit is baking in the oven, add flour, oats, sugar, cinnamon and butter to a mixing bowl. Mix ingredients with your fingers until crumbly. Once the fruit has cooked 20 minutes, remove from oven and sprinkle the crumble evenly over the top of the peaches. Return to the oven and bake for 15 minutes longer. Serve with whipped cream or vanilla ice cream. {Ice cream, ice cream!}

Recipe Source: Mrs. Harding Cooks

Fried Ice Cream

Photo credit to ourbestbites.com

Now, call me blonde, crazy, or stupid, but I thought this stuff was actually fried. Maybe some of it is, but any that I've had has NOT actually been fried.
This stuff is easy...and delicious. Especially with caramel on it. Mmm.


"Fried" Ice Cream

8x8 or 9x9 pan
2 1/2 cups Rice Krispie Cereal
1 cups chopped pecans
1 1/2 cups shredded sweetened coconut
3/4 cups brown sugar
optional: a few shakes of cinnamon
8 tablespoons real butter (1 stick), melted
1/2 gallon vanilla ice cream (or one ‘carton’ since they keep shrinking), softened to the consistency of soft serve

Preheat oven to 300 degrees. Line a 9×13 inch pan with foil, extending a little over the edges of pan.

Place Rice Krispies, pecans, coconut, and brown sugar in a 9×13 inch pan. Drizzle butter over mixture and combine well (a fork, or clean hands work well.) If desired, sprinkle in a few shakes of ground cinnamon and mix in. Bake for about 30 minutes, stirring once or twice during cooking time. Remove from oven when toasted and golden brown and let mixture cool completely.

Remove half of crispy mixture and spread remaining half in an even layer on the bottom of pan. Gently spoon softened ice cream on top of mixture. Use a spoon and very gently spread mixture, being careful to not lift up crisp from bottom of pan. Spread ice cream out evenly and then top with remaining crisp mixture. Gently press top crisp into ice cream with hands. Cover pan with plastic or foil and chill until firm (preferably overnight.) When ready to serve, use foil to completely remove ice cream from pan. Slice into squares and serve.

Recipe Source: Our Best Bites

Frozen Pudding Pops

Oh how I love summer. This summer, I was determined to do more fun stuff. One of those...make homemade popsicles! Luckily, I found these recipes and LOVE them! I've realized that you can make any flavor. However, these are some of my favorites!
Photo credit to ourbestbites.com
Mint-Chocolate Cookie Pudding Pops
1 small box instant chocolate pudding
1 3/4 C half and half
10 Oreo cookies, crushed (about 1 heaping cup)
1/4 t peppermint extract

Blend pudding mix, extract, and half and half in a blender until smooth. Stir in crushed cookies by hand. Place in molds and freeze.
Photo credit to ourbestbites.com

Strawberries and Cream Pudding Pops
1 small box instant vanilla pudding
1 C milk
6oz vanilla yogurt (strawberry is great too){I used greek...ah-mazing!}
12 medium strawberries (about 1 3/4-2 C roughly chopped)
2-3 T sugar {Definitely didn't need this}

remove stems from berries and pulse with 2 T sugar in a food processor until completely smooth. Taste and add more sugar if needed. You should have just over a cup of puree. Set aside.

In a blender combine pudding, yogurt, and milk and blend until combined. Layer or swirl the pudding mixture with the strawberry mixture in popsicle molds and freeze until solid.

There are a few other flavors on the site, but these are the only ones I've tried. And...yum.

Recipe Source: Our Best Bites

"Macaroni Grill" Rosemary Bread

Hello, hello. I realize I've taken quite a hiatus, and I don't even have an "official" reason. We've just been so amazingly busy! With fun stuff...but I'm excited for calm...maybe not calm, but "slower".
This is one of my favorite recipes...so freaking good! The two times I've made it, the two loaves have only lasted about 30 minutes, if that. Its also pretty easy for homemade bread, which is always a plus!
Dip this in oil & vinegar, and you can die happy.
Photo credit to melskitchencafe.com
Macaroni Grill Rosemary Bread
Makes 2 loaves
1 tablespoon instant yeast or 1 1/2 tablespoons active dry yeast
1 tablespoon sugar
1 1/2 cups warm water
2 3/4 – 4 cups all-purpose flour
1 1/2 teaspoon salt
1 1/2 tablespoons dried rosemary, chopped and divided
2 tablespoons butter, melted
Coarse salt for sprinkling

In a large bowl (or the bowl of an electric stand mixer if you have one), combine the yeast, sugar and water. If using active dry yeast, let the mixture stand until foaming and bubbly, about 5 minutes. If using instant yeast, proceed with the recipe. Add two cups of the flour, salt and 1 tablespoon of the chopped rosemary. Mix. Continue adding flour, gradually, until a soft dough is formed. Judge the dough based on texture and feel versus how much actual flour you’ve had to add based on the recipe. The dough should be slightly tacky to the touch but should hold it’s shape while still being soft and smooth. Knead the dough by hand or with an electric mixer for 4-5 minutes, adding additional flour only if the dough is overly sticky and not clearing the sides of the bowl.

Transfer the dough to a lightly greased bowl and cover with greased plastic wrap. Let the dough rise until doubled in size, approximately 1-2 hours, depending on the warmth of your kitchen. Once doubled, gently deflate the dough and divide in half. Prepare a rimmed baking sheet with parchment paper, a silpat liner or lightly grease with cooking spray. Shape the dough into two smooth, oval shaped loaves and place them on the baking sheet, one on each half of the tray so they have room to rise and bake without touching. Use a brush to slather the melted butter over the top of the loaves. Continue brushing on the butter until it is gone (the loaves will be well-saturated). Sprinkle the remaining chopped rosemary over the top of the loaves, patting down gently to set into the dough, if needed. Cover the loaves with lightly greased plastic wrap and let them rise again until puffy and nearly doubled, about an hour (again, the exact time will depend on temperature so judge the dough by how it looks).

Preheat the oven to 425 degrees. Lightly sprinkle coarse salt over the top of the loaves. Bake the loaves for 18-20 minutes until browned and baked through. Transfer to a cooling rack to cool completely.

Recipe Source: Mel's Kitchen Cafe

Wednesday, August 1, 2012

Strawberry-Lime Cream Cake {& Whipped Cream Frosting}

Photo credit to melskitchencafe.com

Yeah, my birthday was last month and...I made this...for myself...because that's how I roll. {Don't worry, this one is the last for the night.}
This recipe is rich in a way that I haven't ever really experienced before...non-chocolatey. Weird. Um, loved it though! I've had this thing for strawberry/lime. You should too. It's a lot of work, but worth it!

Strawberry-Lime Cream Cake
White Cake:
2 1/2 cups all-purpose flour
2 cups granulated sugar
1 teaspoon baking powder
1/2 teaspoon baking soda
1/8 teaspoon salt
1 1/3 cups buttermilk
1/2 cup butter, softened
1 teaspoon vanilla
4 egg whites

Strawberry Syrup/Puree:
*You can sub 1 1/2 cups of strawberry jam for the puree* {I think jam would be too sweet}
1 pint fresh strawberries, washed and hulled
4 tablespoons sugar
1 teaspoon lemon juice

Lime Cream:
{I would probably make this much again, but I only used about 2/3 of it!}
4 limes, for 1/2 cup fresh lime juice
1 (14-ounce) can sweetened condensed milk
2 cups heavy whipping cream

Whipped Cream Frosting:
2 cups heavy whipping cream
1/2 cup powdered sugar
1 teaspoon vanilla
1 envelope (about 2 teaspoons) unflavored gelatin
4 tablespoons water

For the cake, preheat the oven to 350 degrees F. In a large bowl, combine the flour, sugar, baking powder, baking soda and salt. Add buttermilk, butter and vanilla. Beat with an electric mixer on low speed for 30 seconds, scraping the bowl as needed. Increase the speed to medium and beat for 2 minutes. Add the egg whites and beat for 2 minutes more, scraping down the sides of the bowl as needed.

Pour the batter into 2 greased and floured 9-inch round cake pans. (I lined the bottom of mine with a parchment circle and greased the top of the parchment circle.) Bake the cakes for 28-30 minutes until a toothpick inserted near the center comes out with moist crumbs. Don’t overbake or the cakes will be dry. Cool the cakes on a wire rack for 10 minutes. Loosen the sides with a butter knife and remove the cakes from the pans to cool completely.

For the strawberry puree, combine all the ingredients in a blender and process until smooth.

For the lime cream, zest and juice the limes into a medium bowl. You should have about 1/2 cup lime juice. Add the sweetened condensed milk and mix well. Add the whipping cream and beat until medium-stiff peaks form. Cover with plastic wrap and refrigerate until needed.

For the whipped cream frosting, in a small bowl, place the water and sprinkle the gelatin over the top. Let the mixture stand for 3-4 minutes until the gelatin has thickened. Microwave for 20-30 seconds until the gelatin dissolves and the mixture is warm. Remove from the microwave and let the mixture cool to room temperature (don’t let it set up!). In a large bowl, whip the cream, sugar and vanilla until slightly thickened. While beating slowly, gradually add the cooled gelatin to the whipped cream mixture. Whip at high speed until stiff peaks form.

To assemble the cake, slice each cooled cake round in half horizontally to form 4 cake circles. Place one cake layer on a cake plate and spread an even layer of strawberry syrup over the top. Spread a thick layer of lime cream over the jam, leaving a 1/2-inch border around the edge as the top cake layers will press the cream out toward the edges. Repeat the same layering process with the next two layers. Top with the final cake layer and frost the entire cake with the whipped cream frosting. Garnish with fresh limes and strawberries, if desired. Chill for 1-2 hours before serving to let the cake set up.

Recipe Source: Mel's Kitchen Cafe

Creamy Lime or Lemon Bars

Photo Credit to ourbestbites.com

Another winner winner chicken dinner. I obviously can't get over the whole dessert/treat thing. I have something like 280 pinned...so this isn't going to end anytime soon!


Creamy Lime or Lemon Bars
Makes 8x8 or 9x9 pan
{Just substitute the lime for lemon in the recipe...duh}
20 Nilla Wafers, finely crushed
1/2 cup flour
1/4 cup firmly packed brown sugar
1/4 cup (1/2 stick) cold real butter
1 package (8 oz.) cream cheese (you can use 1/3-less fat cream cheese)
1 cup granulated sugar
2 eggs, at room temp (just place eggs in a bowl of warm water for about 10 mins)
2 Tablespoon flour
3 Tablespoon grated lemon peel, divided
1/4 cup fresh lemon juice (don’t even think about opening a bottle!)
1/4 teaspoon Baking Powder
powdered sugar

Preheat oven to 350ºF. Line 8-inch square baking pan with foil, with ends of foil extending over sides of pan. Spray lightly with non-stick spray and set aside.

In a bowl, combine Nilla Wafer crumbs, 1/2 cup flour and the brown sugar. Chop butter into small pieces and then cut into crumb mixture with a pastry blender.If you don’t have a pastry blender, just use 2 knives, or even your fingers to break up the butter until mixture resembles coarse crumbs.

Press crumb mixture firmly onto bottom of prepared pan. Bake 15 min.

While crust is cooking, beat cream cheese and granulated sugar with electric mixer on medium speed until well blended. Add eggs, 2 Tbsp. flour, and baking powder; mix well. Blend in 1 Tbsp. lemon zest, and lemon juice and then pour mixture over crust.

Bake 25 to 30 min. or until center is set. Cool completely. Cover and refrigerate at least 2 hours, but preferably overnight {at least overnight...my favorite was two days after I made them}. These bars improve with time {totally}. Sprinkle with powdered sugar and remaining 2 Tbsp. grated lemon peel just before cutting into squares to serve. Store leftover squares in refrigerator. (As if you’ll have leftovers!)

Recipe Source: Our Best Bites

Chocolate Chip Cookie Pie

Photo credit to ourbestbites.com
Oh sweet gooey deliciousness...how I love thee. Especially when I can add ice cream. And fudge. And caramel. I pretty much make a dessert for any reason. This reason? We had friends come and eat leftovers. I couldn't leave them without dessert!

Chocolate Chip Cookie Pie
Makes 9" Pie
1 unbaked 9-inch pie crust, homemade or store-bought.
2 large eggs
1/2 cup flour
1/2 cup white granulated sugar
1/2 cup packed brown sugar
3/4 cup real butter, softened (1 1/2 sticks)
1 cup chocolate chips (semi-sweet or dark works best, you might find milk too sweet) {Semi-sweet was perfect!}
1 cup chopped pecans (you are welcome to make it without nuts) {Although...don't. Love the texture}
Vanilla ice cream, or sweetened whipped cream for serving

Preheat oven to 325° F.

Beat eggs in large mixer bowl on high speed until foamy. Beat in flour, granulated sugar and brown sugar. Beat in butter. Stir in morsels and nuts. Spoon into pie shell {Its pretty runny...don't worry}.

Bake for 55 to 60 minutes or until knife inserted halfway between edge and center comes out clean. Cool on wire rack or serve slightly warmed. Serve with ice cream or whipped cream.

Recipe Source: Our Best Bites