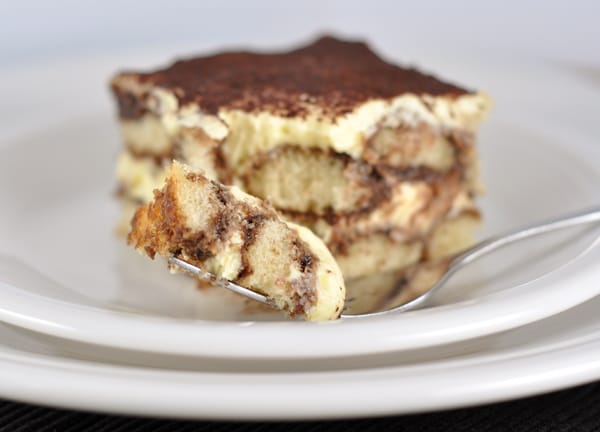
Okay, I totally kept the name that I found with this recipe, because there is no coffee or rum, but it is so delicious…it should be sinful. I've never had tiramisu before this. And I was pleasantly {understatement} surprised at how I've been missing something so amazing in my life. Now I know. And I'm trying to not let anyone else go without. So enjoy!
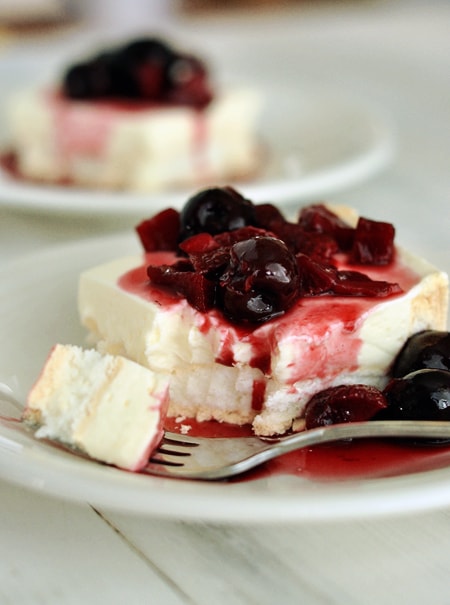
Sinfully Sinless Tiramisu
1 ½ cups good-quality hot chocolate, made with water and using 1 ½ times the hot chocolate powder
½ teaspoon rum extract
½ tablespoon pure vanilla extract
4 large egg yolks
½ cup granulated sugar
1/8 teaspoon salt
¼ cup heavy whipping cream
8 ounces mascarpone cheese (can sub cream cheese in a pinch) {and I did}
½ cup heavy whipping cream
About 36 crisp ladyfingers cookies/biscuits
1 tablespoon natural cocoa powder
Make the hot cocoa according to the instructions above – using water instead of milk and using 1 ½ the amount of hot chocolate powder you would normally use to make a cup for drinking. Allow the hot cocoa to cool while you are preparing the rest of the recipe. Once it is lukewarm, add the vanilla and imitation rum extract. Due to the high cocoa to water ratio, whisk the cocoa mixture frequently to keep the cocoa suspended.
Set a medium saucepan over medium heat and fill with about 1-2 inches water. Let it come to a simmer while you proceed with the recipe. In a medium bowl (an appropriate size to be placed on the pan that is heating), beat the egg yolks at low speed with a mixer (hand or electric) until just combined. Add the ½ cup sugar and salt and beat at medium-high speed until pale yellow, 1 1/2 to 2 minutes, scraping down the bowl with a rubber spatula once or twice. Add ¼ cup cream to the yolks and beat at medium speed until just combined, 20 to 30 seconds; scrape the bowl. Set the bowl with the yolks over the saucepan of water that has come to a simmer. Cook the egg yolk mixture, stirring constantly and scraping along the bottom and sides of the bowl with a heatproof rubber spatula, until the egg yolk mixture coats the back of a spoon, about 4 to 7 minutes. Remove the bowl from the heat and stir vigorously to cool slightly, then set aside to cool to room temperature, about 15 minutes.
Add the mascarpone cheese to the cooled mixture and beat at medium speed until no lumps remain, about a minute. Transfer the mixture to a large bowl and set aside. In the now-empty bowl (no need to clean the bowl), beat the ½ cup heavy whipping cream at medium-high speed until stiff peaks form.
Using a rubber spatula, fold 1/3 of the whipped cream into the mascarpone mixture. Then gently fold in the remaining whipped cream until no white streaks remain. Set the mixture aside.
Give the hot cocoa mixture a good whisk to combine. Pour it into a shallow baking dish like a pie plate.
Dip 1 ladyfinger into the hot cocoa at a time, allowing it to soak up the hot cocoa for about 1-2 seconds per side. Transfer each ladyfinger immediately to an 8-inch square baking dish. Lay the cookies side-by-side to create one even layer. You may have to trim/break the soaked cookies to fit the pan. After finishing the first layer of ladyfinger cookies, spread half of the mascarpone cream mixture evenly over the ladyfingers, spreading to the edges of the pan. Using a small fine-mesh strainer, sprinkle 1/2 tablespoon of the natural cocoa powder over the mascarpone layer.
Repeat the soaking process with the ladyfingers, creating one more layer of ladyfinger cookies over the mascarpone/cocoa layer. Spread evenly with the remaining mascarpone mixture. Dust with the final 1/2 tablespoon of natural cocoa powder. Refrigerate for at least 4 hours to chill and set. This can be made up to 1 day in advance. Cut into squares and serve.
*Note: Let’s talk about this dessert a moment, shall we? Traditional tiramisu is made with espresso-and-rum-soaked ladyfingers. The mascarpone layer is also usually lightened with silky, fluffy beaten egg whites. The version below, created by my brother and further adapted by me, has subbed in hot cocoa and rum extract for the espresso and rum and I’ve employed the technique of cooking the egg yolks and making a custard of sorts instead of using egg whites, since I know many people are nervous about eating raw eggs. This makes my version a bit more dense than authentic tiramisu since the creamy layer is like a pudding or custard…but since I basically threw authenticity out the window to begin with, I went with the cooking-the-eggs method. The result is incredible, I promise.


.jpg "Baked Lobster Tails Recipe")