Saturday, January 26, 2013

Stuffed Mushrooms

Another awesome recipe from my MIL. They are delicious and SO easy. The only problem is they're so delicious, that we eat the whole pan...which is a LOT. Ah well...worth the calories.

Photo Credit to eclecticark.blogspot.com
Stuffed Mushrooms
1/2 pound sausage
4-6 ounces cream cheese
about 10 large mushrooms {or I use a package of regular mushrooms}

Cook sausage, drain grease. Mix with cream cheese. Wash mushrooms and take stems out. Put upside down in baking dish and fill each with sausage mixture.

Bake at 350 for 20 minutes.

Recipe Source: Sharrie Webster

Wednesday, January 23, 2013

Red Velvet White Chocolate Chip Cookies

This is a fun swaperoo (yes, that's my word), from regular chocolate chip cookies. Just a chocolate base with "vanilla" chips. They're pretty delicious, but that's what's awesome about anything red velvet.
Photo Credit to cookingclassy.com
Red Velvet White Chocolate Chip Cookies
1 1/2 cups all-purpose flour
2 1/2 Tbsp cocoa powder
1 tsp cornstarch
3/4 tsp baking powder
1/4 tsp salt
1/2 cup butter, softened
1 cup granulated sugar
1 tsp distilled white vinegar
1 large egg
1 1/2 tsp vanilla extract
1 1/2 tsp red food coloring
3/4 cup white chocolate chips, divided

Preheat oven to 375 degrees. In a mixing bowl whisk together flour, cocoa powder, cornstarch, baking powder and salt, set aside.
In the bowl of an electric stand mixer fitted with paddle attachment, whip together butter, sugar and vinegar until pale and fluffy, about 3 - 4 minutes. Mix in egg. Add in vanilla and red food coloring and mix until blended. With mixer set on low speed, slowly add in dry ingredients and mix just until combine. Mix in white chocolate chips (note: I mixed in half of the white chocolate chips then set aside the other half to press into the tops of the rolled dough balls so more of them show through when baking...but I just noticed over at Gonna Want Seconds that she just pressed some extra white chocolate chips into the tops of cookies AFTER baking, genius!). Scoop dough out by the heaping tablespoonfuls and shape into balls. Transfer to Silpat or parchment paper lined baking sheets and bake in preheated oven 9 - 11 minutes. Allow to cool on cookie sheet before transferring to a wire rack to cool. Store cookies in an airtight container.

Recipe Source: Cooking Classy

Sweet Potato Tacos

My good friend, Laurel, not so lightly urged me to try these tacos. I'm SO GLAD I did!! They are awesome! Take tacos, add a little sweet, but awesomely healthy. These tacos. Saweet.
Photo Credit to the Blanchard Bistro
Sweet Potato Tacos
½ pound ground beef or turkey {I used a full pound, but will use 1/2 next time}
2 Tablespoons taco seasoning {I used one packet}
½ cup tomato sauce {I used a whole can}
1 can (15 oz.) black, kidney, or pinto beans, drained
5-6 cups sweet potatoes, peeled and cut into 1/2-inch cubes
2 tablespoons butter
½ teaspoon salt
1½ cups chopped fresh spinach
1½ cups shredded cheddar cheese
tortillas, sour cream, salsa, fresh cilantro, and/or guacamole for garnish

Preheat oven to 425ºF. Brown ground meat in a skillet over medium-high heat. Stir in taco seasoning, tomato sauce, and beans. Set aside.

Spray a 9x13 inch casserole dish with non-stick spray. Place sweet potato cubes in the pan and top with the butter and a sprinkle of salt. This is where you'd add the spinach if you had it, but if you don't, it's still darn yummy. Then add the taco meat and bean mixture and the cheese {I added the cheese when I assembled the tacos}. Cover with foil and bake for 25-30 minutes, until the sweet potatoes are tender.

Serve in a tortilla with sour cream, salsa and a few sprigs of fresh cilantro. And guacamole if you have some.

Makes 6 servings.

Notes {from Kimma, where I found the recipe}:
This may be my fastest turnaround from seeing a recipe to saving it (on Pinterest, of course) to making and eating it to photographing and blogging it. All done in just about a day and a half! And that's saying something. I'm really on a sweet potato kick at the moment, so whenever I see a recipe doing something creative with them, I get really excited. And this one was really, really great. A keeper, for sure. Especially with homemade tortillas, as seen in the photo above (only because we didn't have any from the store, but now I wonder if I'll ever go back!).

I've made this multiple times now - we LOVE it! I even tried it in the slow cooker recently and it worked like a charm. I did up the sweet potatoes to 3 medium sized (probably closer to that 6 cups of cubed sweet potato that the original recipe calls for, but I'm not totally sure because I didn't actually measure). I also added a whole can (1 cup) of tomato sauce to the meat/bean mixture just because I didn't want to have a half can sitting in my fridge and then going moldy (that's what happened last time). It was perfect. Still haven't tried it with spinach, but I think it would be wonderful. Black or kidney beans are my usual choices. And I don't add cheese in the oven/slow cooker (I did the first time, but ever since nope) - I just sprinkle some on top as garnish in my taco shell.

Recipe Source: The Blanchard Bistro

Monday, January 21, 2013

Light & Fluffy Dinner Rolls

So my mom gets rolls for the Warren Christmas party basically every year. We used to get them from a bakery that made fluffy, buttery, scrumptious rolls that were to die for. Now, she gets some great rolls, but cannot remember where she got "the rolls." Luckily, I came across this recipe. They are the closest things to "the rolls" I've ever found and they are so good I can't stop eating them (no matter how much willpower I don't have).

Light & Fluffy Dinner Rolls
Makes 48 rolls
1 1/2 cups of milk
3/4 cup + 1 Tablespoon Sugar
1 egg
1 Tablespoon salt
2 Tablespoons yeast
2 cups of warm water
about 9-10 cups of all purpose flour
at least 1 cup of butter

Photo Credit for all photos to howdoesshe.com
To start out: Scald 1 1/2 cups of milk, 3/4 cup sugar and 1/2 cup of butter, in a microwave safe bowl, for about 2 minutes. Cutting the butter into pieces helps it melt faster. There will probably be some little cubes of butter still floating in the hot mixture, they will melt.

We are going to add yeast to this hot mixture, but it will be too hot to just dump the yeast straight in (it would kill it!). To cool it down stir in 1-2 cups of flour, then add 1 egg and 1 Tablespoon of salt, and leave it to cool for a couple of minutes. Meanwhile, in a measuring cup dissolve 2 Tablespoons of yeast in 2 cups of warm water and 1 Tablespoon of sugar. Let it sit for a couple of minutes until it is bubbly.

**Keep track of how much flour you are adding!!!
Make sure your milk mixture is just warm, not boiling and add the yeast mixture!
Using a fork or wooden spoon, gradually stir in 9-10 cups of flour (counting the flour you have already added to cool it earlier). I would recommend only adding 2 cups at time and stirring in between. These rolls turn out so much better when they are mixed by hand.
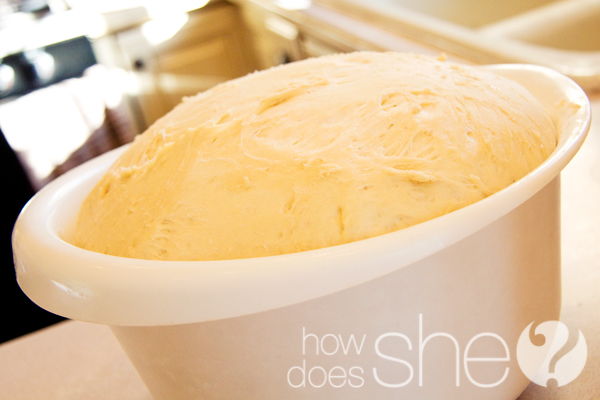
At the end the dough will be dense and sticky, and may be hard to stir, you can use your hands to incorporate the rest of the flour if needed. Be sure not to add too much flour. Then smooth the dough out and cover the bowl with plastic wrap. Leave it in a warm place and let it raise.
I came across this fun Thanksgiving idea on Pinterest – for Gratitude Rolls. I thought it was so cute and wanted to show you all how it’s done! Gather a list of things for which your family is thankful. Type it up in columns, then print it out. Yes, my 3-year-old said he was grateful for chocolate milk.. but I’m pretty sure we can all agree
Cut the list into strips with scissors or a paper cutter. Then set them aside.
When your dough is close to raising completely, butter 2 cookie sheets and set them aside.
Let the dough raise until it has doubled in size.
Cover your working space with flour to prevent the dough from sticking. Dump your dough out and divide it into 4 balls. Eyeball the sizes, then lift them up and feel the weight of each ball. Try to make them even, but they don’t have to be perfect.
Using one ball of dough at a time: roll the dough into a circle on a floured counter. Once it is rolled out spread the top with butter from edge to edge. You will use about 2 Tablespoons per circle of dough.

Cut the dough into quarters using a pizza cutter.

Then cut each quarter into 3 pieces. You should end up with 12 triangles from each circle of dough.

If you would like to add the thankful notes, now is the time!

Place one thankful note lengthwise on the triangle of dough.

Make sure you spread plenty of butter when using these notes, It will prevent them from sticking!Whether or not you include a thankful note, you will roll the dough starting with the wide end of the triangle.

Tuck the tail of the triangle under the roll and place it on the buttered cookie sheet. You will make 3 rows, with 8 rolls per row. This will give you 24 rolls per pan. Two balls of dough will fill 1 pan. You will get a total of 48 rolls!

Pre-heat your oven to 350 degrees. Place the pans of rolls in a warm place (on top of the oven if possible) to let them rise. Once they are touching and full in size, cook (one pan at a time) in the oven ’till they are golden brown. About 10 – 15 minutes, It may take longer depending on how hot your oven cooks. Keep a close eye on your first pan to get the right time for the second.

While they are still hot and fresh out of the oven run a stick of butter over the tops of the rolls for a delicious buttery glaze.

The kids will love opening these thankful rolls. It’s just like a fortune cookie!

Read aloud the many things you are grateful at your Thanksgiving feast.

Make it a game and guess who’s thankful note you are reading!

These yummy dinner rolls will be a hit at any event!

Recipe Source: How Does She

Pumpkin Blondies with Chocolate Chips

These are moist, gooey, delicious pumpkin bars that, most of the time, turn to blobs of heaven when put in the same bowl as ice cream. Awe.some.
Photo Credit to melskitchencafe.com
Pumpkin Blondies with Chocolate Chips
Makes 9x13 pan
2 1/3 cups all-purpose flour
1 tablespoon pumpkin pie spice*
1 teaspoon cinnamon
1 teaspoon baking soda
3/4 teaspoon salt
1/2 cup (1 stick) butter, room temperature
1/2 cup unsweetened applesauce
3/4 cup granulated sugar
3/4 cup dark brown sugar
1 large egg
2 teaspoons vanilla extract
1 (15-ounce) can pure pumpkin puree
2 cups semisweet chocolate chips
3/4 cup pecans; roughly chopped (optional)

Preheat oven to 350 degrees F. Line a 9X13-inch pan with parchment paper or foil, leaving an overhang on each long side so the bars can be easily pulled out of the pan once they are done baking and cooling.

In a medium bowl, whisk together flour, pumpkin pie spice, cinnamon, baking soda, and salt; set aside. In the bowl of a stand mixer or in a large bowl using a handheld electric mixer, cream the butter, applesauce, granulated sugar and brown sugar on medium-high speed until smooth. Beat in egg and vanilla until combined. Add pumpkin puree and mix until combined. Don’t worry if the mixture looks curdled – that’s completely fine!

Mix in the dry ingredients, stirring just until combined. Fold in the chocolate chips and pecans (if using).

Spread the batter evenly in the prepared pan. Bake until the edges begin to pull away from the sides of the pan and a toothpick inserted in the center comes out with just a few moist crumbs attached, 35 to 40 minutes. Cool completely in the pan before lifting the bars out of the pan, cutting into squares and serving.

*For a homemade pumpkin pie spice mix use the following, 1/2 teaspoon cinnamon, 1/4 teaspoon ginger and 1/8 teaspoon nutmeg and 1/8 teaspoon cloves. Mix together for the equivalent of 1 teaspoon pumpkin pie spice.

Recipe Source: Mel's Kitchen Cafe

Pumpkin Cream Cheese Muffins

Not sure if I've said this yet, but this last fall was the first real "pumpkin rampage" I've ever gone on. I wanted all things pumpkin. I made desserts, breakfasts, soups, etc. And I'm still not sick of it. I could bake up a pumpkin storm right now and be completely satisfied. Probably because I kept making awesome things, like these muffins. They. Are. Awesome. And I love cream cheese, so...yeah...D-lish.
Photo Credit to The Girl Who Ate Everything
Pumpkin Cream Cheese Muffins
24 muffins
8 oz. cream cheese, softened
1 cup confectioners’ sugar
3 cups all-purpose flour
1 tsp. ground cinnamon
1 tsp. ground nutmeg
1 tsp. ground cloves
1 tbsp. plus 1 tsp. pumpkin pie spice
1 tsp. salt
1 tsp. baking soda
4 large eggs
2 cups sugar
2 cups pumpkin puree
1¼ cups vegetable oil
½ cup sugar
5 tbsp. flour
1½ tsp. ground cinnamon
4 tbsp. cold unsalted butter, cut into pieces

To prepare the filling, combine the cream cheese and confectioners’ sugar in a medium bowl and mix well until blended and smooth. Transfer the mixture to a piece of plastic wrap and shape into a log about 1½-inches in diameter. Smooth the plastic wrap tightly around the log, and reinforce with a piece of foil. Transfer to the freezer and chill until at least slightly firm, at least 2 hours.

To make the muffins, preheat the oven to 350˚ F. Line muffin pans with paper liners. In a medium bowl, combine the flour, cinnamon, nutmeg, cloves, pumpkin pie spice, salt and baking soda; whisk to blend. In the bowl of an electric mixer combine the eggs, sugar, pumpkin puree and oil. Mix on medium-low speed until blended. With the mixer on low speed, add in the dry ingredients, mixing just until incorporated.

To make the topping, combine the sugar, flour and cinnamon in a small bowl; whisk to blend. Add in the butter pieces and cut into the dry ingredients with a pastry blender or two forks until the mixture is coarse and crumbly. Transfer to the refrigerator until ready to use.

To assemble the muffins, fill each muffin well with a small amount of batter, just enough to cover the bottom of the liner (1-2 tablespoons). Slice the log of cream cheese filling into 24 equal pieces. Place a slice of the cream cheese mixture into each muffin well. Divide the remaining batter among the muffin cups, placing on top of the cream cheese to cover completely. Sprinkle a small amount of the topping mixture over each of the muffin wells.

Bake for 20-25 minutes. Transfer to a wire rack and let cool completely before serving. (It may be hard to resist immediate consumption, but the cream cheese filling gets very hot!)

Recipe Source: Annie's Eats

Nutella Stuffed French Toast

Seriously? How could you, number one, turn this down...and number two, not love this? It's got NUTELLA in it. I love that stuff. It's only been since I've gotten married that I even knew what Nutella was, and since then...it's changed my life for the fatter better.
Photo Credit to sixsistersstuff.com
Nutella Stuffed French Toast
4 slices Texas Toast {I used whole wheat bread, worked great!}
2 eggs
1/4 cup heavy cream {I bet you could use milk here, no problem}
1/8 cup powdered sugar
4 Tbsp Nutella
maple syrup
fresh fruit

Preheat a nonstick skillet over medium low heat. In a bowl whisk together the eggs, cream, and powdered sugar. Take 2 slices of the Texas Toast {or bread} and spread 1 Tbsp of Nutella {or more!} on each one. Sandwich together and dip both sides in the custard mixture. Grill on each side until brown, about 3-4 minutes. Remove from heat and serve immediately with maple syrup or fresh fruit.
{We used the famous cream syrup}

Recipe Source: Adapted slightly from Six Sister's Stuff

Thursday, January 17, 2013

Creamy White Chicken Chili

This is one of my favorite soup/stews. It is divine. Creamy, delicious, a little kick, and chunky. Holy cow, Mel outdid herself on this one. We've been making it for years! Try it if you want to kick your soup up a notch this winter.
Creamy White Chili
Photo Credit to melskitchencafe.com
Creamy White Chicken Chili
Serves about 61 pound boneless, skinless chicken breasts, cut into 1/2-inch cubes
1 medium onion, chopped
1 1/2 teaspoons garlic powder or 2 cloves fresh garlic, finely minced
1 tablespoon oil
2 cans (15 1/2 ounces each) Great Northern Beans, rinsed and drained
1 can (14 1/2 ounces) chicken broth
2 cans (4 ounces each) chopped green chilies (if you like less kick, add just one can)
1 teaspoon salt
1 teaspoon ground cumin
1 teaspoon dried oregano
1/2 teaspoon pepper
1/4 teaspoon cayenne pepper
1 cup sour cream
1/2 cup whipping cream
Fresh cilantro, for garnish (optional)

In a large saucepan, saute chicken, onion and garlic powder (or fresh garlic, if using) in oil until chicken is no longer pink. Add beans, broth, chilies and seasonings. Bring to a boil. Reduce heat; simmer, uncovered, for 30 minutes. Remove from the heat; stir in sour cream and cream. Garnish with fresh cilantro, if desired. Serve immediately. This is especially good served with tortilla chips.

Slow Cooker Option: In a medium round slow cooker, place 1 pound chicken breasts (fresh or frozen) without cubing them. Add the chopped onion, garlic powder, beans, green chiles and all of the spices. Do not add the sour cream or whipping cream yet! Reduce the chicken broth to 12 ounces (about 1 1/2 cups) and pour in over the other ingredients. Stir the mixture around a bit to incorporate the dry spices. Cook on low for 5-7 hours (if using frozen chicken you’ll cook on the longer end of that spectrum, fresh chicken will cook in less time). Remove the chicken to a cutting board and shred in bite-size pieces. Stir back into the slow cooker. In a small bowl or liquid measuring cup, whisk together the sour cream and whipping cream until smooth. Whisk the cream mixture into the crockpot with the other ingredients. Let the soup cook until heated through. Serve.

Recipe Source: Mel's Kitchen Cafe

Ham & Broccoli Quinoa Bites

I've been intrigued by quinoa lately. I feel like it's popping up in all sorts of recipes...and it's delicious. I don't know what it is about the texture, or the taste...and supposedly it's very healthy...but I love it. I've made some soup, and these yummy things. They're fun when you actually make them in the mini muffin tins; you just pop a whole bunch in your mouth.
melskitchencafe.com: Cheesy Ham and Broccoli Quinoa Bites
Photo Credit to melskitchencafe.com
Ham & Broccoli Quinoa Bites
Makes 2-3 dozen mini bites
3 cups cooked quinoa, chilled or at room temperature (I prefer to cook quinoa in low-sodium chicken broth for added flavor)
2 eggs, lightly beaten
8 ounces deli ham, chopped fine {I used less, and will continue to}
1-2 cups finely chopped steamed broccoli {see note}
1/2 teaspoon salt
1/4 teaspoon black pepper
1/4 cup finely shredded Parmesan cheese
2 cups shredded sharp cheddar cheese

Preheat the oven to 350 degrees F. In a large bowl, stir together all the ingredients except the cheese until combined. Stir in the cheese until well-distributed. Lightly grease a mini muffin cup tin. Scoop the quinoa mixture into the tin, filling the cups all the way to the top and lightly pressing to pack the mixture a bit. I found it helpful to use my cookie scoop (about 2 tablespoon size) to scoop the mixture into the tin. Bake for 15-18 minutes, until golden on top. Remove from the tin and repeat with the remaining mixture (you can scoop it into the warm tin and bake again). Serve warm or at room temperature.

Note: I like lightly steamed broccoli here versus raw. If you don’t have broccoli, try subbing in zucchini, carrots or a myriad of other veggies. Good quality ham is key here – I really like the Hormel Natural Choice ham or leftover baked ham. While this recipe is written for a mini muffin tin, you could just as easily use a standard size muffin tin, increasing the baking time until they are heated through. If you are cooking your quinoa in water, you will probably want to increase the salt in the recipe a bit.

Recipe Source: Slightly adapted from Mel's Kitchen Cafe

{Oh My Gosh} Spaghetti Squash

This fall, I got about 9 spaghetti squashes from my mother in law, so I started searching for some recipes. I came across this beaut. It's a "new age" recipe {or at least that's what I'd call it}. It's very nutritious, delicious, and awesome.
Photo Credit to mynewroots.org
Oh my Gosh, Spaghetti Squash
1 spaghetti squash
1 bunch kale {or spinach}
1 ½ cups cooked chickpeas (or 1 can)
3 cloves garlic
olive oil
sea salt
pinch crushed chilies {or red pepper flakes}
¾ cup toasted hazelnuts
Pecorino Romano {or fresh parmesan}

Preheat oven to 400°F.
Prepare the spaghetti squash by cutting it in half lengthwise, removing the seeds, rubbing the inside of each half with a drizzle of olive oil, then seasoning with salt and pepper. Place face down on a lined baking tray and place in the oven – cook for about 45 minutes.
While the squash is baking, prepare the rest of the filling. Wash kale well and remove the tough center rib of each leaf. Roughly chop kale into small pieces.
Heat oil, ghee, or butter in a frying pan, then add minced garlic, crushed chilies to taste, and a pinch of sea salt. Cook 2 minutes until fragrant, then add chopped kale and cook until the leaves are bright green and just starting to lose structure. {I will try spinach next time because even though I let the kale lose structure, they were still quite tough} Throw in the chickpeas and cook just to warm. Remove from heat.
Remove squash form the oven when it is cooked through. Using a fork, scrape out the insides, which will pull away from the shell in strands, like spaghetti (whoa). Place all strands in a bowl, and toss with the kale and chickpea mixture. At this point you can either serve it from the bowl, or mix it everything together and place back in one half of the empty squash shells for a beautiful presentation. Sprinkle with chopped toasted hazelnuts and shaved Pecorino Romano. Enjoy.

Recipe Source: Adapted slightly from My New Roots via Pinterest

Friday, January 11, 2013

Spinach Dip

My mom has made this spinach dip at every Thanksgiving and Christmas party she has attended for the last...10 years? It's delicious, easy, and SO yummy. Everyone loves it. (The secret is, she got the recipe from the box).
Knorr Spinach Dip
Photo Credit to knorr.com
Spinach Dip
1 package frozen, chopped spinach
16 ounce sour cream
1 cup mayonnaise
1 package Knorr vegetable dip
1 can water chestnuts
3 green onions

Combine all ingredients and chill about 2 hours. 
Serve with your favorite dippers {my favorite are tortilla chips and French bread} to your favorite people.

Recipe Source: Knorr

Cheese Ball

Another one of my mom's awesome recipes. Maybe it's not awesome, but I love it because I grew up with it! You should try it, because it's awesome.
Photo Credit to Yankee Magazine
Cheese Ball
8 ounce cream cheese
8 ounces cheddar cheese
4 chopped whole green onions
1 tablespoons worcestershire sauce
1 tablespoons mayonnaise
1/2 teaspoon garlic salt
dash of pepper
1 cup walnuts, chopped

Mix together well. Form into a ball with your hands, roll in chopped walnuts.

Orzo with Parmesan and Basil

We went to a Relief Society dinner about a year ago and they made the BEST food! It was so delicious! And they loved us all enough to give all the recipes to everyone. I haven't tried to make all of them at home, but this one I've made at least 5 times. It's easy and so yummy. It's a great carb side dish!
Photo Credit to Tasty Kitchen
Orzo with Parmesan and Basil
2 tablespoons butter
1 cup uncooked orzo pasta
1 (14.5 ounce) can chicken broth {or about 1.5 cups}
1/2 cup parmesan cheese
1/4 cup chopped fresh basil {or this stuff instead, which I LOVE! Don't know how much exactly...}
salt and pepper to taste

Melt butter in heavy skillet over medium-high heat. Stir in orzo and sauté until lightly browned.
Stir in chicken stock and bring to boil. Cover, reduce heat and simmer until orzo is tender and liquid is absorbed, about 15-20 minutes.
Mix in basil, well, then add parmesan cheese. Season with salt and pepper. Transfer to shallow bowl and garnish with basil sprigs.

Recipe Source: My Relief Society

Sunday Roast

Remember how I said my Grandma Schwartz only made a handful of things? This is that roast. It is delicious and moist, and pretty basic, but that's what I love about it! So easy, but yummy. And its a crock pot recipe. Slow Cooker + Delicous = my best friend!
Photo Credit to tasteofhome.com
Sunday Roast
1 can cream of mushroom
1 package aujus gravy mix
1 3-5 lb beef roast
Onions
Potatoes, quartered {at least}
Carrots
Peas
Any other veggie you want

Place all in slow cooker and cook on low for 6-8 hours.

Recipe Source: Grandma Schwartz

Thursday, January 10, 2013

Steak & Pepper Hoagies

Hey everybody! How are you? I'm great. Deliciously great because I just ate these sandwiches and they were AWESOME! They are easy, although they take awhile because of the marinating.

Spicy Steak and Pepper Hoagies
Photo Credit to recipe.com
Steak & Pepper Hoagies
2 teaspoons chili powder
1 teaspoon onion powder
1 teaspoon oregano
1/2 teaspoon garlic powder
1/2 teaspoon black pepper
1 tablespoon olive oil
1 1/2 pound flank steak
3 1/2 red/green peppers
1/2 teaspoon salt
1 cup salsa
6 hoagie rolls

Mix spices together well, then oil, rub into both sides of the steak and put in bag. Refrigerate for at least 4 hours.
Grill peppers (cut in half and cored) ten minutes until slightly charred.
Season steak with salt and pepper, then grill 8-10 mins.
Slice pepper into strips and toss with salsa then cover.
Slice steak, then toss with pepper & salsa and put on rolls.
Add cheese if you would like...and I would like!!

Recipe Source: a Magazine from my old job...so I'm not sure

Cowboy Dinner

This is one of the two dinners that Scott requests all the time. I would say his favorite dinner of all time. It's easy, quick, and pretty healthy. Sweet, salty, and hearty. Seriously, make this and you will love your life.
Photo Credit to melskir
Cowboy Dinner
9x13 pan
1-1 1/2 pounds lean ground beef {or ground turkey}
1 medium yellow onion, diced
1 teaspoon salt
1/2 teaspoon black pepper
1 cup-1 can corn
1 can green beans {this was my addition}
1 1/2 cups salsa (jarred or homemade)
1 can (15 ounce) black, pinto or white beans, rinsed and drained
1 cup shredded cheddar cheese

Cornbread Topping:
½ cup cornmeal
1 ½ cup flour
1/3 cup sugar
1 tablespoon baking powder
½ teaspoon salt
1/3 cup oil
2 eggs, beaten
1 ¼ cup milk

DIRECTIONS:
Preheat the oven to 375. Lightly grease a 9X13-inch pan and set aside.

In a large 12-inch skillet, brown the ground beef and onion, adding the salt and pepper, over medium-high heat until the beef is no longer pink. Drain the grease from the pan. Stir in the corn, salsa, and beans. Pour the beef mixture into the prepared 9X13-inch baking pan and set aside.

For the cornbread, combine the cornmeal, flour, sugar, baking powder and salt in a medium bowl. Make a well in the center and add the oil, beaten eggs and milk. Whisk together until just moistened and no dry spots remain.

Sprinkle the cheese over the beef mixture and pour the cornbread batter over the cheese and beef mixture. Gently spread the cornbread to the edges of the pan, evening it out over the top of the casserole.

Bake for 30-40 minutes until the edges are bubbly and a toothpick inserted into the center of the cornbread comes out clean or with a few moist crumbs. Let the casserole stand for 10 minutes before serving.

Recipe Source: Slightly adapted from Mel’s Kitchen Cafe

Saturday, January 5, 2013

Chicken and Butternut Quinoa Stew

So we're quite obsessed with this Butternut Soup. A lot. I think I've made it at least 4 times this year which is a LOT for me and my ADD- have to try everything new-cooking attitude. It's my hubby's favorite. So, we bought a whole bunch of butternut squash and now I've been trying to find fun recipes with this squash because it's delicious. This one is a keeper. It was hearty and scrumptious!
Photo Credit to melskitchencafe.com
Chicken and Butternut Quinoa Stew
Serves 6ish
1 tablespoon extra-virgin olive oil
1 medium yellow onion, finely chopped
1 1/2 teaspoon dried oregano
4 cloves garlic, finely minced
4 cups low-sodium chicken broth
1 1/2 pounds boneless, skinless chicken thighs or chicken breasts
1 can (14-oz) petite or regular diced tomatoes
3 cups chopped butternut squash (about 1 medium squash, peeled and seeded)
2/3 cup uncooked quinoa
1/2 teaspoon salt
1/2 teaspoon black pepper
1-2 cups chopped fresh spinach

In a large 4 quart pot heat the olive oil until hot. Add the chopped onions, oregano, and garlic. Saute for 5-7 minutes, stirring often, until the onion is softened. Add the broth and bring to a boil. Add the chicken and boil until the chicken is cooked, 7-9 minutes. Remove the chicken to a plate.

Add the tomatoes, butternut squash, and quinoa. Simmer for 15 minutes until the squash is tender and quinoa is cooked. If desired, scoop out some of the squash, mash it and return it to the pot. Shred the cooked chicken and return to the pot. Add the salt and pepper, adding more salt to taste, if needed. Stir in the spinach. Cook 1-2 minutes until the spinach is wilted. Serve warm.

Note: It was missing a little something, so I think I would add some onion or garlic salt...or more spices...or something.

Recipe Source: Mel's Kitchen Cafe