Showing posts with label Home. Show all posts

Friday, October 3, 2014

Chicken Pot Pie Crumble

This stuff is so delicious, and doesn't have condensed cans of soup which makes it lighter and healthier. Not to mention it's delicious {Did I say that already?} Unfortunately this ended up on our my "will not make list" for a couple of years because I might've been in my first trimester with Lil when I made it. Oops. It's back on the list now and it's awesome!
Chicken Pot Pie Crumble
Photo Credit to Mel's Kitchen Cafe
Chicken Pot Pie Crumble
Chicken and Sauce:
1 ½ pounds chicken (about three medium-size chicken breasts)
2 cups low-sodium chicken broth
1 tablespoons olive oil
1 onion , chopped fine (about 1 cup)
3-4 carrots, peeled and sliced (about 1 cup)
2-3 stalks celery, chopped (about ½ cup)
½ teaspoon salt
½ teaspoon pepper
4 tablespoons (1/2 stick) butter
½ cup flour
1 cup milk
3/4 cup frozen peas
Crumble Topping:
2 cups all-purpose flour
2 teaspoons baking powder
3/4 teaspoon salt
½ teaspoon pepper
1/8 teaspoon cayenne pepper
6 tablespoons butter, cut into 1/2-inch cubes and chilled
3/4 cup freshly grated Parmesan cheese
1 cup heavy cream

DIRECTIONS
To prepare the chicken, place the chicken and broth in a large Dutch oven or pot and bring it to a simmer over medium heat. Cook the chicken until it is just done (don’t overcook or it will dry out) – about 10-12 minutes. Alternately, if you are planning in advance, you can place the chicken and broth in a slow cooker and cook on high for 3 hours or low for 5 hours. Transfer the cooked chicken to a medium bowl. Pour the broth through a fine-mesh strainer into a liquid measuring cup and reserve. Return the pot to the stovetop (no need to wash if you used it to cook the chicken).
Preheat the oven to 400 degrees. In a large bowl, combine the flour, baking powder, salt, pepper, and cayenne. Sprinkle the chilled butter pieces over the top of the flour. Using your fingers or a pastry cutter, rub the butter into the flour mixture until it resembles coarse crumbs. Stir in the Parmesan cheese. Add the cream and stir until just combined. Crumble the mixture into irregularly shaped pieces onto a baking sheet lined with parchment paper. Bake the crumble topping until fragrant and starting to brown, about 15 minutes, tossing halfway through. Set aside.
For the filling, heat the olive oil in the now-empty pot over medium heat. Add onion, carrots, celery, salt and pepper. Cover and cook, stirring occasionally, until just tender, about 5 minutes. While the vegetables are cooking, shred the chicken into small bite-size pieces. Transfer the cooked vegetables to the bowl with the chicken; set aside.
Over medium heat melt the butter in the empty pot. Stir in the flour and cook for one minute, stirring constantly. Slowly whisk in the reserved chicken broth and milk. Bring to a simmer and stir occasionally until the sauce thickens, about 5 minutes, taking care not to burn the bottom. Add 1/2 teaspoon salt and 1/2 teaspoon pepper. Remove from the heat and stir the chicken, vegetables and peas into the sauce.
Pour the mixture into a 9×13 pan. Scatter the crumble topping evenly over the filling. Place the 9X13-inch pan on a rimmed baking sheet and bake at 400 degrees until the topping is well browned, about 15-20 minutes. Let the casserole stand for 10 minutes before serving.

Recipe Source: Mel's Kitchen Cafe

Monday, March 31, 2014

Macaroni Shrimp Salad

This is the classic recipe for macaroni shrimp salad, but I absolutely love it. How could you not? Macaroni, shrimp, and mayo plus other yummies? Perfectly delicious.
Shrimp Macaroni Salad | foodiecrush.com
Photo Credit to Foodie Crush
Macaroni Shrimp Salad
12 ounce package macaroni, cooked
1/2 22 ounce bottle miracle whip
2 cans sliced olives
2 bunches green onion
1/2 stalk celery
1 pound shrimp, rinsed
Pinch of: 
garlic salt
onion salt
seasoned salt

Add all ingredients into a large mixing bowl and mix well. Best if served after a few hours of refrigeration.

Recipe Source: Susan Warren

Sunday, March 30, 2014

{Grandma's} Funeral Potatoes

I have never had any funeral potatoes that taste like these. They are super delicious and I swear that they are from Heaven. Which is awkward since they're funeral potatoes…
Photo Credit to Jamie Cooks It Up
{Grandma's} Funeral Potatoes
10-12 large potatoes
1/3 grated onion
2 cups sour cream
2 cans cream of chicken soup
2 cups grated cheese
1 cube of margarine
1 cup crushed cornflakes

Boil potatoes for 40 minutes then shred. In a large saucepan, put 1/2 the butter, cream of chicken soup, sour cream, cheese & onion. Heat until cheese is melted. Pour that over the potatoes in a big bowl and mix. Put that mixture in a 9x13. Melt the other 1/2 of butter and mix with cornflakes. Put those on top of the potato mixture.
Bake at 350 for 30-45 minutes.

Recipe Source: Grandma Schwartz

Sweet Potato Crunch

This lovely was sent to me by my mother-in-law, Sharrie. Its pretty easy and so delicious, especially for Thanksgiving.
Sweet Potato and Carrot Crunch
Photo Credit to Pots & Pans, etc, etc.
Sweet Potato Crunch
3 large sweet potatoes
4 tablespoons butter, softened
2 eggs
1/3 cup evaporated milk
1 teaspoon vanilla
1/2 cup sugar

Topping:
1/3 cup butter, melted
1 cup brown sugar
1/2 cup flour
1 cup chopped pecans

Bake Sweet potatoes until tender at 350 for 45-60 minutes. Remove skins, mash, then add rest of ingredients and mix well. Spread in a baking dish.
Mix the topping ingredients well, the spread over the sweet potatoes. Bake at 350 for 30 minutes.

Recipe Source: Sharrie Webster

Thursday, April 4, 2013

Pumpkin Cinnamon Rolls

We were in Seattle for Thanksgiving. I'm a doer, right? I love to be involved and do...everything {whether or not I have the time or energy...I'm crazy sometimes}. So when I heard that we didn't have to do anything for dinner on Thanksgiving {because my awesome Brother in law was doing everything himself...awesome guy!}, I started to panic a little. I have to make something for Thanksgiving.

Then I offered to do breakfast and found this recipe. Who doesn't like warm homemade rolls on a rainy Thanksgiving morning? They were delicious and ooey gooey {Yes, that's a word...ooey} with a hint of pumpkin. Loved them!
pumpkin cinnamon rolls
Photo Credit to Smitten Kitchen
Pumpkin Cinnamon Rolls
Yield: 16 to 18 buns
Dough:
6 tablespoons unsalted butter, to be divided
1/2 cup whole milk, warmed (but not over 116 degrees)
2 1/4 teaspoons active dry yeast (from 1 .25-ounce or 7 gram envelope yeast)
3 1/2 cups all-purpose flour, plus extra for rolling out
1/4 cup (packed) light or dark brown sugar
1/4 cup granulated sugar
1 teaspoon table salt
1/2 teaspoon ground cinnamon
1/4 teaspoon freshly grated nutmeg
1/8 teaspoon ground cardamom (optional)
1/4 teaspoon ground ginger
2/3 cups pumpkin puree
1 large egg
Oil for coating rising bowl

Filling:
3/4 cup (packed) light or dark brown sugar
1/4 cup granulated sugar
1/8 teaspoon table salt
2 teaspoons ground cinnamon

Glaze:
4 ounces cream cheese, softened
2 tablespoons milk or buttermilk
2 cups powdered sugar, sifted
Few drops vanilla extract

Make your dough: Melt your butter, and hey, if you’re melting it in a little saucepan, you might as well brown it for extra flavor. Once the butter has melted, keep cooking it over medium heat for a few additional minutes. It will become hissy and sizzle a lot, then take on a nutty flavor as golden bits form at the bottom of the pot. Remove from heat and set aside to cool slightly.
Combine your warmed milk and yeast in a small bowl and set aside. After five to seven minutes, it should be a bit foamy. If it’s not, you might have some bad yeast and should start again with a newer packet.
In the bottom of the bowl of an electric mixer combine flour, sugars, salt and spices. Add just 1/4 cup (or two-thirds of; leave the rest for assembly) of your melted/browned butter and stir to combine. Add yeast-milk mixture, pumpkin and egg and mix combined. Switch mixer to a dough hook and run it for 5 minutes on low.
Scrape mixture into a large oiled bowl and cover with plastic wrap. Set aside for 1 hour in a draft-free place; it should just about double.
While it is rising, line the bottom of two 9-inch round cake pans (8-inch round should work too, as does an 8-inch square) with parchment paper and butter the sides of the pan and the paper.

Assemble buns: Scoop dough onto a very well floured surface and flour the top of it well. With a rolling pin, roll the dough to an approximately 16×11-inch rectangle. Brush reserved melted/browned butter over dough. Stir together remaining filling ingredients and sprinkle mixture evenly over dough. Starting on a longer side, roll the dough into a tight spiral. It’s going to make a mess because the dough is crazy soft and some stuff spills off the ends; don’t sweat it. It will all be delicious in the end.
Here’s how to cut cinnamon rolls without squishing their pretty spirals: With a sharp serrated knife, using absolutely no pressure whatsoever (only the weight of the blade should land on the dough) gently saw your log with a back-forth motion into approximately 1-inch sections. When a soft dough like this is rolled, it tends to grow longer, which means that you’ll have the option to either make more buns (say, 18 instead of 16) or just cut them a little larger (in generous inches).

Divide buns between two prepared pans. You can sprinkle any sugar that fell off onto the counter over them. Cover each pan with plastic wrap and let rise for another 45 minutes.
If you’re doing this ahead of time, you can now put them in the fridge overnight. In the morning, leave them out for an hour to warm up and finish rising.
15 minutes before you’re ready to bake them, heat the oven to 350°F. Meanwhile, you can make the glaze. Beat your cream cheese until it is light and fluffy. Add powdered sugar and vanilla. Drizzle in milk until you get the consistency you’re looking for, either thick enough to ice or thin enough to drizzle.

Finish your buns: Remove the plastic and bake buns for 25 minutes, until puffed and golden and the aroma brings all the boys to your yard is like a snickerdoodle. Transfer pans to wire cooling racks and drizzle/schmear with cream cheese glaze, then have at them.

Recipe Source: Smitten Kitchen

Tuesday, July 24, 2012

Paprika Chicken Stroganoff


Oh yum. This wasn't a super "in your face, punch you with flavor" kind of dish. It was warm and inviting with a subtle paprika flavor if you really tried to focus on that. Plus egg noodles...delightful!


Paprika Chicken Stroganoff
Serves 4-6
1 pound boneless, skinless chicken breasts, chicken thighs or a combination of both, cut into bite-sized pieces
1 tablespoon sweet paprika or regular paprika
1 teaspoon salt
1/2 teaspoon black pepper
2 tablespoons all-purpose flour
2 tablespoons olive oil, plus more as needed
1 medium yellow onion, diced (about 1/2 cup)
8 ounces white button mushrooms or baby bella mushrooms, sliced
2 cloves garlic, finely minced
1 3/4 cups low-sodium chicken broth
2 tablespoons tomato paste
1 bay leaf
1/4 cup plain yogurt, creme fraiche, or sour cream
Hot, cooked egg noodles, for serving (about 12 ounces to 1 pound)
Fresh, chopped parsley for garnish

In a medium bowl or shallow pie plate, toss the cubed chicken with the paprika, salt and pepper. Sprinkle the flour on top of the chicken and toss to coat.

Heat the olive oil in a large 12-inch nonstick skillet over medium heat until rippling and hot. Add the chicken in a single layer and cook until golden brown on each side, tossing occasionally, about 5 minutes. The chicken will finish cooking fully a bit later so it doesn’t need to be cooked all the way through. Scrape the chicken onto a plate and set aside.

Add another teaspoon of oil to the pan, if needed, and stir in the onions and mushrooms. Saute the mixture, stirring occasionally and scraping up the browned bits from the chicken, until the onion is translucent and the onions and mushrooms are browned, about 5 minutes. Add the garlic and cook for another minute, until fragrant.

Pour in about 1/4 cup of the chicken broth and deglaze the pan by scraping up any bits from the bottom. Stir in the tomato paste, whisking to combine. Add the rest of the chicken broth and the bay leaf, stirring well.

Add the chicken back into the skillet and simmer the mixture over medium-low to medium heat, until the chicken is cooked through and the sauce thickens slightly, about 5-6 minutes. Stir in the yogurt (or creme fraiche or sour cream) and cook for about 2-3 minutes longer. If you would like the sauce to be a bit thicker, make a cornstarch slurry by mixing 1 tablespoon cornstarch with 1-2 tablespoons cold water. Add the cornstarch slurry to the simmering mixture in the skillet, whisking quickly to combine. Let the mixture simmer for 2-3 minutes until thickened. Serve over hot noodles and garnish with fresh parsley, if desired.

Recipe Source: Mel's Kitchen Cafe

Spaghetti Squash Au Gratin


Half of the reason I make any recipes that I make is because of pinterest. Thank you for making my life more fun...and making me fatter.
This one was actually pretty healthy. I guess "pretty healthy" is kind of relative, but I didn't feel super guilty eating this...so thats a good sign. I must say it was pretty delicious for "pretty healthy"!

Photo credit to dandydishes.blogspot.com

Spaghetti Squash Au Gratin
Serves 6
1 medium spaghetti squash
2 tablespoons butter
1 small yellow onion, cut in half and very thinly sliced
¼ teaspoon red pepper flakes, or more if you like it spicy
1 teaspoon fresh thyme
½ cup sour cream
½ cup shredded cheddar cheese

Cut the spaghetti squash in half and remove the seeds. Place in a covered dish with a ¼ inch of water and microwave for 10 -12 minutes. In a medium sized skillet over medium heat, add the butter, onions, red pepper and thyme and cook until the onions are slightly brown in color. Salt and pepper to taste.

Using a fork, scrape the insides of the squash and transfer to a small bowl. Combine the squash, onions, sour cream and half the cheese together and mix well. Transfer the mixture to a buttered baking dish and top with remaining cheese.

Place into a 375ยบ for 15 – 20 minutes until golden brown on top.

Recipe Source: Dandy Dishes

Note: I'm planning on adding more spice next time. Maybe herbs...definitely salt and pepper at least.

Friday, March 30, 2012

Smothered Pork Chops

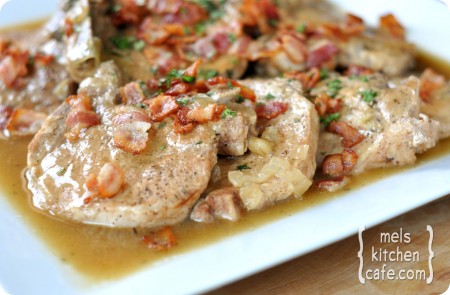
I never thought this day would come. My mother-in-law is an amazing cook/baker/person. From the beginning of my marriage, I secretly want to be just as good as she is, although I knew it would take some time. Well...that day came last week when I made these. Quote from Scott "These are the best pork chops I've EVER had." That means better than any that his mom has made. No offense to his mom at all, only big compliments for being so hard to equal! So...thank you Mel for making me feel a little equal to my awesome mother-in-law.
Photo Credit to melskitchencafe.com ... obviously

Smothered Pork Chops
Makes 6-12 pork chops
5 slices bacon, chopped
6 bone-in pork loin chops, about 3/4-inch thick {I did 6, but would do more next time because there was a TON of gravy leftover that I didn't know what to do with}
Salt and Pepper
2 yellow onions, peeled, halved and sliced into 1/2-inch thick half moons
1 teaspoon plus 1 tablespoon light brown sugar
1/4 cup plus 2 tablespoons cold water
3 garlic cloves, minced
1 teaspoon dried thyme
3 cups low-sodium chicken broth
1 tablespoon soy sauce
2 bay leaves
1 tablespoon cornstarch
1 tablespoon cider vinegar
2 tablespoons fresh parsley, chopped

In a large skillet over medium heat, fry bacon until lightly browned, about 5-6 minutes. Transfer bacon to a plate lined with paper towels, leaving the drippings in the pan. If you have more than 2 tablespoons drippings, drain the excess. If you don’t have quite that much, supplement with canola oil. When the bacon is cool, transfer to a small bag or tupperware and refrigerate until later.

Heat the skillet with the drippings over medium or medium-high heat until rippling and hot. Meanwhile, pat pork chops dry with paper towels and sprinkle with salt and pepper. Cook pork chops until they are golden brown on each side, about 2 minutes per side, cooking them in batches in the skillet if your skillet isn’t big enough to hold all six at a time in a single layer. When golden on each side, transfer the chops to the slow cooker and repeat with remaining pork.
Pour off all but 1 teaspoon of fat from the skillet; add onions, 1 teaspoon brown sugar, 1/4 teaspoon salt and 1/4 cup water to empty skillet. Using a wooden spoon, scrape browned bits from bottom of the pan and cook over medium-high heat until onions are soft, about 4-6 minutes. Stir in garlic and thyme and cook until fragrant, about 30 seconds. Pour onion mixture over chops in the slow cooker. Add broth, soy sauce and remaining 1 tablespoon brown sugar to skillet, bring to a boil and add bay leaves. Pour mixture over onions in slow cooker.

Cover slow cooker and cook on low until pork is tender, about 8 hours (or cook on high for 4 hours).

When ready to serve, carefully transfer chops to serving platter with a large spoon and tent with foil. Discard bay leaves and pour liquid through a mesh strainer into a saucepan, reserving the solids. Transfer solids to a food processor or blender with 1 cup liquid and blend until smooth. Stir the blended mixture back into remaining liquid in the saucepan. In a small bowl, mix cornstarch and remaining 2 tablespoons water together in a small bowl and stir into sauce. (I ended up doing a couple more tablespoons of cornstarch because I like my gravy thick) Cook over medium heat until thickened and bubbly, about 5 minutes. Stir in vinegar, season with salt and pepper, pour over chops and sprinkle with reserved bacon and parsley. Serve.

I served with mashed potatoes...delicious and a wonderful "homecooked" meal.

Recipe Source: Mel's Kitchen Cafe

Tuesday, October 11, 2011

Garlic Mashed Potatoes


My wonderful neighbor, Brittny, let me borrow her The Essential Mormon Cookbook. I went through the entire book and picked some recipes that I actually thought I might like.

Now don't judge this dish by my picture...my camera is not the best, nor are my photography skills (but I AM working on it.)


Garlic Mashed Potatoes
Makes 8-10 servings

   5  lbs potatoes
1/2  cup grated onion
   3  Tbs butter
   5  cloves garlic, minced
   2  cups sour cream
1/4  cup butter, softened
   2  tsp salt
1/2  tsp pepper

Peel potatoes and cut into large chunks. Cover with water and boil until tender, drain. Mash well and set aside. Microwave onion and butter for 2 minutes. Add minced garlic, then microwave for 1 more minute. Add to potatoes, then also stir in sour cream, 1/4 cup butter, salt and pepper. Spoon into 9x13 pan. Cover with foil and bake at 325 for 30 minutes.