Showing posts with label Miscellaneous. Show all posts

Friday, October 3, 2014

Oreo Buttercream Frosting

I made this to put on top of chocolate cupcakes for my mom's side of the family and they went crazy over it {and for good reason}. It's like fluffy Oreo flavor drenching your mouth with deliciousness.

Post image for Oreo Cupcakes
Photo Credit to My Baking Addiction
Oreo Buttercream Frosting
1 stick salted butter – room temperature
1 stick unsalted butter – room temperature
1 cup shortening
1 tablespoon Clear Vanilla extract
2 pounds confectioner’s sugar (powdered sugar, 10x)
4-6 tablespoons very cold milk (I used 5 TBS)
8 crushed Oreo cookies with the cream removed before crushing

Cream the butter and shortening in the bowl of an electric or stand mixer. Add the clear vanilla extract and combine well. Begin adding in the sugar and mixing thoroughly after each addition. After all of the sugar has been added and mixed thoroughly, begin adding the very cold milk, one tablespoon at a time, combining very well after each addition (mixer on medium-high to high speed) until you reach the desired consistency. Fold in the Oreo cookie crumbs. Top cooled cupcakes with the buttercream frosting and garnish with 1/2 an Oreo.

Recipe Source: My Baking Addiction

Homemade Pizza Sauce

Mel does it again. The simplest, most flavorful pizza sauce I've ever made. And make at least once a month!
The Best Pizza Sauce
Photo Credit to Mel's Kitchen Cafe
1 (14 1/2-ounce) can diced tomatoes, undrained
1 (6-ounce) can tomato paste
1 teaspoon sugar
1/2 teaspoon dried oregano
1/4 teaspoon garlic salt
1/2 teaspoon dried basil
Pinch of crushed red pepper {optional}

Combine all ingredients in food processor or blender and blend until desired consistency. I leave mine slightly chunky. You can adjust the seasonings to taste. This recipe is open to interpretation. Use what you like, taste it along the way and it is sure to be delicious!

Recipe Source: Mel's Kitchen Cafe

Tuesday, September 23, 2014

Ricotta Cheese

One time I needed ricotta cheese and I was too lazy to run to the store, so I made some. I know that seems weird, like maybe making your own cheese is a lot more work than running to the store. You are mistaken friend...this stuff was super easy and it made me very happy. Plus, it was actually really yummy.

Ricotta Cheese
2½ tbsp. lemon juice
2 tbsp. distilled white vinegar, plus more as needed
2 quarts pasteurized whole milk
1 tsp. salt

Be sure your milk is fresh homogenized or pasteurized – not ultra-pasteurized or ultra-heat-treated (these will not curdle correctly.)


Combine the milk and salt in a medium saucepan over medium-high heat. Continue to heat, stirring occasionally, until the milk registers 185˚ F on an instant-read thermometer.


While the milk is heating, prepare a colander and line with a double layer of cheesecloth. (Cheesecloth can be found in the baking aisle of most grocery stores.)


Once the milk has reached the desired 185˚ F, remove from the heat.


Stir in the lemon juice and vinegar. The mixture will begin to curdle quickly. Stir just enough to evenly distribute the acids. Let rest 5-10 minutes.


When the mixture is adequately curdled, it will have separated into white curds and translucent yellow whey. Gently stir at the edge to ensure that this has occurred. If there is still milky whey in the in the pot after 10 minutes, add in more vinegar 1 tablespoon at a time and let sit 2-3 minutes more until the curds separate.


Very carefully pour the mixture into the prepared colander. If you want to reserve the whey, be sure to place a bowl underneath the colander. Let drain about 8-12 minutes (shorter for a moist result, longer for a drier end product. Moist is best for an appetizer-type spread, drier is better for lasagna and the like.) Transfer the curds to a bowl, stir, cover, and refrigerate until chilled. Store up to 5 days. {or you could be like me and wait til it grows mold}

Recipe Source: Annie's Eats

Thursday, September 18, 2014

Succulent Grilled Pork Tenderloin

Okay, so I thought this thing was delicious. And so did Scott. Then we gave it to our girls...and they went nuts. I've never seen them eat so much meat ever (except maybe shrimp). Needless to say, it was a delicious and wonderful hit, and we will be making it over and over again.
Succulent Grilled Pork Tenderloin
Photo Credit to Mel's Kitchen Cafe
Succulent Grilled Pork Tenderloin
2-3 pounds pork tenderloin
1/2 cup soy sauce
1/4 cup orange juice
1/4 cup pineapple juice
2 tablespoons packed light brown sugar
1 tablespoons grated fresh ginger
2 cloves garlic, finely minced

In a medium bowl, whisk together the soy sauce, orange juice, pineapple juice, brown sugar, ginger and garlic. Place the pork tenderloins in a ziploc bag and pour the marinade over the pork. Seal the bag and refrigerate the pork for 8-12 hours (perfect to prepare overnight for grilling the next day).
Preheat an outdoor grill to medium heat. Grill the pork tenderloins for 8-12 minutes per side, until the pork is cooked through. Tent the pork with foil and let it rest 5-10 minutes before cutting into slices and serving warm.

Recipe Source: Mel's Kitchen Cafe

Sunday, March 30, 2014

Sweet Potato Crunch

This lovely was sent to me by my mother-in-law, Sharrie. Its pretty easy and so delicious, especially for Thanksgiving.
Sweet Potato and Carrot Crunch
Photo Credit to Pots & Pans, etc, etc.
Sweet Potato Crunch
3 large sweet potatoes
4 tablespoons butter, softened
2 eggs
1/3 cup evaporated milk
1 teaspoon vanilla
1/2 cup sugar

Topping:
1/3 cup butter, melted
1 cup brown sugar
1/2 cup flour
1 cup chopped pecans

Bake Sweet potatoes until tender at 350 for 45-60 minutes. Remove skins, mash, then add rest of ingredients and mix well. Spread in a baking dish.
Mix the topping ingredients well, the spread over the sweet potatoes. Bake at 350 for 30 minutes.

Recipe Source: Sharrie Webster

Saturday, March 8, 2014

Garlic Herb Butter

This stuff is so amazing. I loved making paninis with it, putting it on Rustic Crusty Bread…and anything else you could possibly think of.
Garlic and Herb Butter Spread
Photo Credit to Mel's Kitchen Cafe
Garlic Herb Butter
8 ounces cream cheese, softened
1 cup butter (2 sticks), softened
1/4 teaspoon garlic powder
1/4 teaspoon onion powder
1/4 teaspoon sugar
1/2 teaspoon oregano
1/4 teaspoon pepper
1/8 teaspoon thyme
1/8 teaspoon basil
1/4 teaspoon dried parsley
1/8 teaspoon celery salt
1/4 teaspoon salt

In a medium bowl, whip the cream cheese and butter with a handheld mixer (or electric stand mixer) until light and fluffy and smooth. Add in the spices and herbs and mix until well combined. Serve at cool room temperature with slices of artisan bread.

Recipe Source: Mel's Kitchen Cafe

Saturday, February 8, 2014

{Copycat} Wingers Amazing Sauce

My husband loves Winger's sauce so much. Every time we go to Winger's, he gets so excited, and eats like it's nobody's business. So when I tried this recipe for Super Bowl Sunday, and it was just like it, we both kind of flipped out. We were both so excited…and he dipped everything that he ate in this sauce.
Wingers Wings with Freakin' Amazing Sauce - the ORIGINAL recipe! from FavFamilyRecipes.com
Photo Credit to Favorite Family Recipes
{Copycat} Wingers Amazing Sauce
1/3 c. Franks Hot Sauce (It has to be Franks Hot Sauce... no other sauce will taste as good)
1 1/2 c. brown sugar
1 Tbsp. water

Heat up hot sauce, brown sugar and water in a saucepot until all the sugar dissolves. Remove from heat and allow to cool to room temp before adding to wings OR prepare ahead of time and refrigerate. The wings turn out best if you don't pour warm sauce over them. You want it nice and thick.

Recipe Source: Favorite Family Recipes

Friday, February 7, 2014

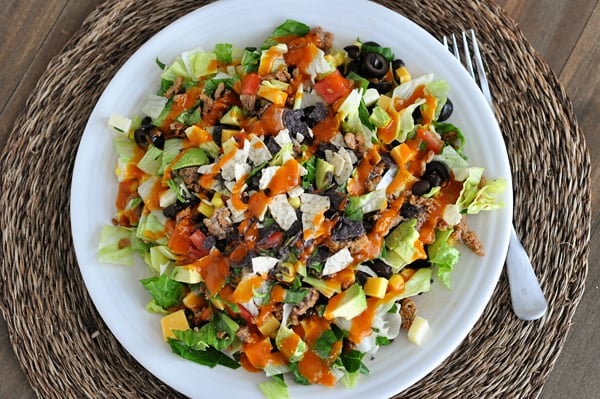
Chopped Taco Salad with Homemade Catalina Dressing

I love salads, especially lately. I honestly don't know why. This one is a simple taco salad, but what I really love about this recipe is the Catalina dressing. I've never tried Catalina before, so I'm not sure how it compares...but I love it!
Chopped Taco Salad
Photo credit to Mel's Kitchen Cafe
Chopped Taco Salad with Homemade Catalina Dressing
1/2-1 pound ground turkey or beef
1/2 head romaine lettuce, chopped
1/2 head iceberg lettuce, chopped
1/2 cup cilantro chopped
1 cup cubed (small) cheese, cheddar, Monterey Jack, Pepper Jack, etc.
1 cup frozen or fresh corn kernels (thawed if frozen)
1 6-ounce can olives, chopped {I didn't put these in because…I don't like olives. Gasp!}
1 15-ounce can black beans, rinsed and drained
2 roma or plum tomatoes, chopped
1-2 avocados, chopped
Crushed tortilla chips

Dressing:
1/4 cup ketchup (see note)
1/4 cup granulated sugar
1/4 cup red wine vinegar
1/4 cup onion finely chopped
1/2 teaspoon paprika
1/4 teaspoon Worcestershire sauce
1/2 cup extra-virgin olive oil
Salt and pepper to taste

In a large, nonstick skillet, brown the ground turkey or beef with salt and pepper (about 1 teaspoon of each) until cooked through, breaking up the meat into bite-size pieces as it cooks. Drain excess grease if needed. Scrape the meat onto a paper towel-lined plate and set aside to cool a bit.
For the dressing, combine all the dressing ingredients together in a blender and process until smooth. Refrigerate until ready to serve. The dressing can be made up 3-4 days in advance.
In a large bowl, toss all the salad ingredients together (including the cooled meat) except the crushed tortilla tips.
Serve the salad with the dressing and crushed tortilla tips.
Recipe Source: Mel's Kitchen Cafe

Wednesday, November 20, 2013

Strawberry Butter

Love this. It was awesome on…everything. Perfect.

Photo Credit to One Ordinary Day
Strawberry Butter
1 cup salted butter
1/4 cup confectioners sugar
1/2 cup chopped strawberries

Using an electric mixer, beat butter and sugar until creamy. 
Add strawberries and beat until mixed. 
Refrigerate until serving. {Warm up a little before using}

Recipe Source: Sweet Paul

Whole Wheat Pizza Dough

Love Mel. She always has awesome family-friendly recipes. Here we have a healthy, delicious, and quick pizza dough that I'm always cool with because we're always cool with pizza.
Black Bean Pizza
Photo Credit to Mel's Kitchen Cafe
Whole Wheat Pizza Dough

1 1/2 cups warm water
1 1/2 tablespoons instant yeast
1 1/2 tablespoons sugar
1 1/2 tablespoons oil
1 1/2 teaspoons salt
3-4 cups whole wheat flour

Position an oven rack in the lower third of the oven and preheat the oven to 450 degrees F (preheating a pizza stone if you have it; if not, flip a rimmed baking sheet upside down and preheat that instead). 
In the bowl of a stand mixer fitted with a dough hook (or you can definitely do this the old-fashioned way by hand in a large bowl), combine the water, yeast, sugar, oil and salt. There's no need to proof the yeast if using instant yeast. If you are using active dry yeast, let the mixture stand for 4-5 minutes until the yeast is foaming. 
Add the flour gradually until a soft dough forms that isn't too sticky to the touch (see the note below). 
Knead for 3-4 minutes. Cover and set aside while preparing the other ingredients.

Recipe Source: Mel's Kitchen Cafe

*Note: Don't stress too much about the exact flour amount in the pizza dough recipe. What is most important is to add flour until the dough is soft and smooth. If you have to add more or less than the range I gave, that's ok, as long as the dough isn't over sticky (and conversely, isn't overfloured).

Sunday, May 12, 2013

Fast Awesome Pizza Dough

Every Friday night at the Farrer residence (or at our house, depending on if we invite them to share their tradition at our house), there is a pizza night tradition. Or calzone, depending on the mood we're in. They make this pizza dough every time. Why you ask? It's so fast. Seriously rises in 20-30 minutes. Also, it's like heaven in dough form. I'm actually not sure where they got it, but I fetchin love it (yes I said fetchin).
Photo credit to foodnetwork.com
Fast Awesome Pizza Dough
3 cup warm water
2 tablespoon yeast
1 teaspoon sugar
2 tablespoon powdered milk
1 teaspoon salt
6-8 cup flour

Mix water, yeast and sugar. Add 3 cups flour and milk. Add salt and any herbs then 2 cups flour. Add remaining flour until not sticky. Knead 5-10 minutes. Raise 20 minutes.
Flatten {pretty thin, it rises some more while cooking}, top with sauce and toppings.
Bake at 400 degrees for 18 mins.
Photo credit to ducksoven.blogspot.com
Note: If you are doing calzones, only put toppings on half, then fold crust over and pinch sides together. Brush with melted butter and garlic powder mixed {makes it too delicious!}

Recipe Source: Laurel Farrer {No idea who her source is...}

Saturday, December 8, 2012

Cookies & Cream Peanut Butter

Remember my obsession with peanut butter? Just another fact to prove that fact. I tried this recipe.
I probably shouldn't have, but you can bet your bottom dollar I'm going to make it again. It added sweet creaminess, and chunky cookies. It is SO good, although very hard to only eat one spoonful at a time...
Photo Credit to picky-palate.com
Cookies & Cream Peanut Butter
10 whole Oreo Cookies{Next time, I'm not going to use fresh cookies so I don't get as big of a crunch}
2 Cups creamy peanut butter
1 cup white chocolate chips
2 tablespoons creamy peanut butter

Crush Oreos into small pieces and place into a large bowl. Add 2 cups peanut butter.
Place white chips and 2 tablespoons peanut butter into a double boiler and stir until melted. Add to bowl of Oreos and peanut butter. Stir just a little so you have a bit of swirls of chocolate throughout. Place peanut butter into a jar or eat from the bowl...

Recipe Source: Adapted from Picky Palate

Wednesday, August 1, 2012

Strawberry-Lime Cream Cake {& Whipped Cream Frosting}

Photo credit to melskitchencafe.com

Yeah, my birthday was last month and...I made this...for myself...because that's how I roll. {Don't worry, this one is the last for the night.}
This recipe is rich in a way that I haven't ever really experienced before...non-chocolatey. Weird. Um, loved it though! I've had this thing for strawberry/lime. You should too. It's a lot of work, but worth it!

Strawberry-Lime Cream Cake
White Cake:
2 1/2 cups all-purpose flour
2 cups granulated sugar
1 teaspoon baking powder
1/2 teaspoon baking soda
1/8 teaspoon salt
1 1/3 cups buttermilk
1/2 cup butter, softened
1 teaspoon vanilla
4 egg whites

Strawberry Syrup/Puree:
*You can sub 1 1/2 cups of strawberry jam for the puree* {I think jam would be too sweet}
1 pint fresh strawberries, washed and hulled
4 tablespoons sugar
1 teaspoon lemon juice

Lime Cream:
{I would probably make this much again, but I only used about 2/3 of it!}
4 limes, for 1/2 cup fresh lime juice
1 (14-ounce) can sweetened condensed milk
2 cups heavy whipping cream

Whipped Cream Frosting:
2 cups heavy whipping cream
1/2 cup powdered sugar
1 teaspoon vanilla
1 envelope (about 2 teaspoons) unflavored gelatin
4 tablespoons water

For the cake, preheat the oven to 350 degrees F. In a large bowl, combine the flour, sugar, baking powder, baking soda and salt. Add buttermilk, butter and vanilla. Beat with an electric mixer on low speed for 30 seconds, scraping the bowl as needed. Increase the speed to medium and beat for 2 minutes. Add the egg whites and beat for 2 minutes more, scraping down the sides of the bowl as needed.

Pour the batter into 2 greased and floured 9-inch round cake pans. (I lined the bottom of mine with a parchment circle and greased the top of the parchment circle.) Bake the cakes for 28-30 minutes until a toothpick inserted near the center comes out with moist crumbs. Don’t overbake or the cakes will be dry. Cool the cakes on a wire rack for 10 minutes. Loosen the sides with a butter knife and remove the cakes from the pans to cool completely.

For the strawberry puree, combine all the ingredients in a blender and process until smooth.

For the lime cream, zest and juice the limes into a medium bowl. You should have about 1/2 cup lime juice. Add the sweetened condensed milk and mix well. Add the whipping cream and beat until medium-stiff peaks form. Cover with plastic wrap and refrigerate until needed.

For the whipped cream frosting, in a small bowl, place the water and sprinkle the gelatin over the top. Let the mixture stand for 3-4 minutes until the gelatin has thickened. Microwave for 20-30 seconds until the gelatin dissolves and the mixture is warm. Remove from the microwave and let the mixture cool to room temperature (don’t let it set up!). In a large bowl, whip the cream, sugar and vanilla until slightly thickened. While beating slowly, gradually add the cooled gelatin to the whipped cream mixture. Whip at high speed until stiff peaks form.

To assemble the cake, slice each cooled cake round in half horizontally to form 4 cake circles. Place one cake layer on a cake plate and spread an even layer of strawberry syrup over the top. Spread a thick layer of lime cream over the jam, leaving a 1/2-inch border around the edge as the top cake layers will press the cream out toward the edges. Repeat the same layering process with the next two layers. Top with the final cake layer and frost the entire cake with the whipped cream frosting. Garnish with fresh limes and strawberries, if desired. Chill for 1-2 hours before serving to let the cake set up.

Recipe Source: Mel's Kitchen Cafe

Strawberry-Lime Shortcakes with Coconut Cream

Photo credit to ourbestbites.com
LOVE this recipe. Super easy and de-lish. It's basically strawberry shortcake..."island style."

Strawberry-Lime Shortcakes with Coconut Cream
Angelfood or Pound Cake
4 cup sliced fresh strawberries
½ cup white sugar
4 tablespoons fresh-squeezed lime juice (about 2 limes)

For the Coconut Whipped Cream:
1 cup whipping cream
½ cup powdered sugar
2 teaspoon coconut extract
1 teaspoon vanilla extract
¾ cup toasted coconut

Mix sliced strawberries, sugar, and lime juice. Stir well and set aside. Stir occasionally over about 15 minutes. You want the sugar to dissolve and form a light syrup.
For the cream, place whipping cream in a bowl and beat with an electric mixer for about one minute. Slowly add in powdered sugar, and both extracts. Continue beating until soft peaks form.
Slice cake and spoon a layer of strawberries on top. Include the lime-syrup! Top with a generous dollop of whipped cream and sprinkle with coconut.
This serves about six, but it could be more or less depending on how what size you make them.
{Serve them with a quarter of lime so those that want to can add an extra kick of lime. Again...de-lish!}
{Also, use this coconut cream on LOTS of stuff!}

Recipe Source: Our Best Bites

Cream Cheese Chocolate Frosting

Photo Credit to marthastewart.com
I can't decide if I "wrote" this recipe, or if Martha did. I found a recipe for chocolate cake that referred to a chocolate frosting recipe. However, I didn't love all the bittersweet chocolate (also I didn't have enough!) So I will give you the link for the original and call this my own!!

Cream Cheese Chocolate Frosting
2 1/2+ cups confectioners' sugar
1/4 cup unsweetened cocoa powder
Pinch of salt
6 ounces cream cheese, room temperature
1 1/2 sticks unsalted butter, softened
2 ounces bittersweet chocolate, melted and cooled slightly
1/3-1/2 cup sour cream

Mix together sugar, cocoa, and salt in medium bowl.
Beat cream cheese and butter with a mixer on medium-high speed until smooth. Reduce speed to medium-low; gradually add sugar-cocoa mixture, and beat until combined. Pour in chocolate in a slow, steady stream. Add sour cream; beat until combined. {I added more powdered sugar to taste}

Recipe Source: Extremely adapted from Martha Stewart

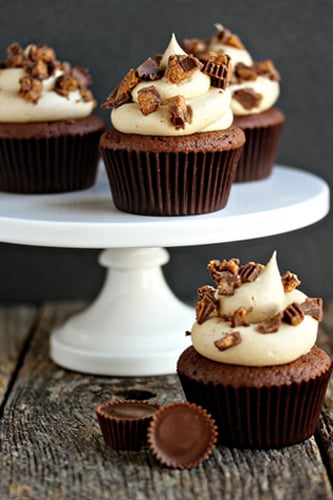
Peanut Butter Cup Cupcakes


Make these. Right now.
I've already posted this recipe "Snicker style". I like peanut butter even more than caramel and...dang. These are amazing. I made these for L's baby blessing. They were a huge hit!
Sinful, my friends...sinful.
Post image for Peanut Butter Cup Cupcakes
Photo Credit to mybakingaddiction.com. Isn't her photography gorgeous?!
Peanut Butter Cup Cupcakes
Makes about 24
Cupcakes
1 (18.25 ounce) package devil’s food cake mix
1 (5.9 ounce) package instant chocolate pudding mix
1 cup sour cream
1 cup vegetable oil
4 eggs, lightly beaten
2 teaspoons pure vanilla extract
1 tablespoon instant espresso granules dissolved in 1/2 cup warm water {I didn't use these-still insanely delicious}
24 Reese’s Miniatures; frozen (this prevents them from disappearing into the batter)
Preheat oven to 350 degrees F. Line muffin tin with paper liners or spray with non-stick cooking spray.

In the bowl of a stand mixer, fitted with the paddle attachment, or with a hand mixer in a large bowl, beat together the cake and pudding mixes, sour cream, oil, eggs, vanilla and espresso water mixture. Beat for about two minutes on medium speed until well combined.

Using a large cookie scoop, distribute the batter between 24 muffin wells; about 3 tablespoons of batter per well. Press one frozen Reese’s Miniature into the center of each cupcake.

Bake in preheated oven for 18-22 minutes or until the tops of the cakes spring back when lightly touched. There will be a small sink hole in the top of the cupcakes from the Reese’s Miniatures, that’s okay - you’ll cover that with frosting. Allow cupcakes to cool inside muffin tins for about 10 minutes.

Remove cupcakes from muffin tins and allow to fully cool on a wire rack. Once cupcakes are cool, prepare your frosting.

Frosting
3 sticks unsalted butter, softened
1 cup creamy peanut butter
2 tablespoons vanilla extract
2 pounds confectioners’ sugar, sifted
6-8 tablespoons heavy cream (if using milk, amount will be less)

In the bowl of a stand mixer, fitted with the paddle attachment, or with a hand mixer in a large bowl, cream butter and peanut butter on medium speed until fluffy. Turn your mixer down to low speed and slowly add in the confectioner’s sugar, and continue mixing until well blended.

Add vanilla and 4 tablespoons of heavy cream. Blend on low speed until moistened. Add an additional 1 to 4 tablespoons of heavy cream until you reach the desired consistency. Beat at high speed until frosting is smooth and fluffy

Pipe frosting onto cooled cupcakes and finish with chopped Reese’s Peanut Butter Cups {and make them pretty}

{Note: I would halve the frosting recipe next time because we had SO much leftover, although...I'm not sure if a half recipe would be enough. Your call!}

Recipe Source: My Baking Addiction

Wednesday, July 11, 2012

Fluffy Honey Butter

Now I realize I have previously posted a honey butter recipe. That one has marshmallow creme, is dense and oh so delish. This one is equally delicious, just different, so I had to document it. It uses powdered sugar which makes is lighter and fluffy. So, it will just depend on the mood I'm in which one I make for scones...
Photo Credit to ourbestbites.com
Honey Butter
2 sticks real butter, (close to room temp- works best when slightly chilled still.)
2/3 cup honey
¾ cup powdered sugar

(If your butter is too soft, you’ll end up with a gooey mess, so I just leave it out on the counter for about 20 minutes or so before beating and it turns out nice and fluffy)

Just place it all in a bowl and beat with an electric hand-mixer for 2-3 minutes on medium-high speed. Serve at room temp.

Recipe Source: Our Best Bites

Friday, June 15, 2012

Roasted Garlic-Tomato Spread

Photo Credit to ourbestbites.com
Dude. Try this. I haven't tried it on anything but a breakfast sandwich...but my mind reels at the possibilities of deliciousness with this spread.

Roasted Garlic-Tomato Spread
Makes just over one cup
1 head roasted garlic {I learned how to roast garlic at ourbestbites.com as well!}
1/2 C sliced sun-dried tomatoes packed in olive oil and herbs
1/2 C mayonnaise
Kosher salt

Toss the garlic, tomatoes, and mayo in the food processor and turn that baby on. Pulse a few times to combine and then add kosher salt to taste. I add a generous pinch. Then turn food processor on and let it process. I actually let mine go for quite a while- it seems to take a while to really break down those tomatoes. I watch the color and when it’s nice and red like in my picture I know it’s how I like it.

Note: I made the breakfast sandwich from OBB and even though it was super easy...it was delish.

Recipe Source: Our Best Bites

Tuesday, May 15, 2012

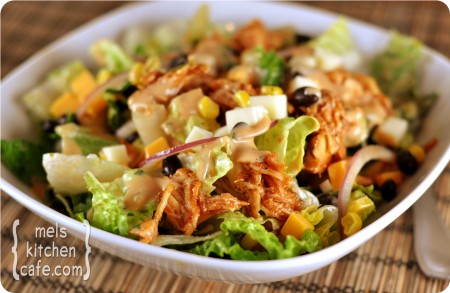
BBQ Chicken Salad with Creamy BBQ Cilantro Lime Dressing

I always feel better when I eat salads, therefore, I tried this one and it was awesome (I don't know how "healthy" it was with the dressing but...who cares?)

Photo Credit to melskitchencafe.com
BBQ Chicken Salad with Creamy BBQ Cilantro Lime Dressing
Serves 4-6
3 cups cooked, shredded chicken
2 cups BBQ sauce, storebought or homemade
½ head iceberg lettuce, cored and chopped
2 romaine hearts, chopped
1/2 red onion diced
¼ cup chopped fresh cilantro
1 1/2 cups frozen corn, thawed
1 can (15 ounces) black beans, rinsed and drained
4 ounces sharp cheddar cheese, cubed small or shredded
4 ounces Monterey jack cheese, cubed small or shredded

Creamy BBQ Cilantro Lime Dressing:
1 cup mayonnaise, light or regular
1/3 cup milk
1/3 cup buttermilk
2 tablespoons fresh cilantro, finely chopped
1 tablespoon lime juice
1 teaspoon white vinegar
1 teaspoon granulated sugar
1 garlic clove, finely minced
1/2 teaspoon salt
1/8 teaspoon cayenne pepper
1/8 teaspoon black pepper
1/4 teaspoon ground cumin
1/4 to 1/2 cup BBQ sauce

For the salad, combine the cooked chicken and BBQ sauce in a medium bowl. Refrigerate until ready to use.
In a large bowl, toss together the iceberg lettuce, romaine lettuce, red onion, cilantro, corn, black beans and cheese. Toss the mixed salad with about 1/4 to 1/2 cup of the dressing, if desired. Otherwise, you can serve the dressing on the side. Place salad on plates and top with the prepared BBQ chicken and additional dressing.
For the dressing, combine all the ingredients together and whisk (or shake, if using a jar) vigorously to combine. You could also run this through a blender to make it even more smooth. Refrigerate until ready to serve.

Recipe Source: Mel's Kitchen Cafe

Sunday, April 1, 2012

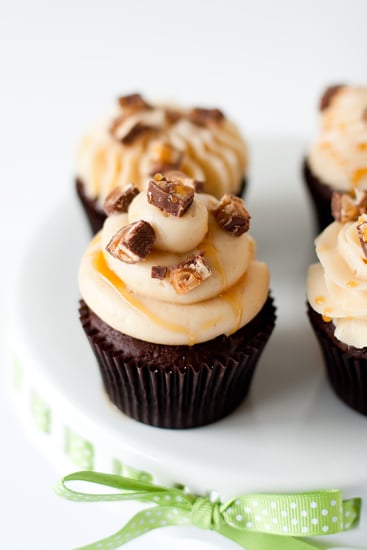
Snickers Cupcakes

I went on a cupcake "spree" about a year ago and found a few really great cupcake recipes! One site I found through all of the searching was My Baking Addiction...holy cow, what a find! She's amazing. I love Snickers bars, so of course, these were a must try and were such a hit, everyone loved them! I hope you do too...

Snickers Cupcakes
Makes 24-30 Cupcakes

Photo Credit to mybakingaddiction.com
Cake:
1 (18.25 ounce) package devil's food cake mix
1 (5.9 ounce) package instant chocolate pudding mix
1 cup sour cream
1 cup vegetable oil
4 eggs; lightly beaten
1/2 cup warm water
1 teaspoon of vanilla
24-30 frozen Snickers Miniatures
Frosting:
2 sticks unsalted butter; room temperature
1/2 cup shortening
2 teaspoons pure vanilla extract
1 1/2 pounds confectioners’ sugar
1/3 cup caramel topping; plus more for drizzling
1/4 teaspoon salt


Preheat oven to 350 degrees F. Line (2) 12 cup muffin tins with paper liners.
In a large bowl, mix together the cake and pudding mixes, sour cream, oil, beaten eggs, vanilla and water. Evenly divide the batter amongst the prepared pans.
Gently push a frozen Snickers Miniature bar into the center of the batter and smooth the surface making sure to cover the candy bar with batter.
Bake for 18-22 minutes, or until top is springy to the touch and a wooden toothpick inserted comes out clean. Cool cupcakes thoroughly on wire rack.
Meanwhile: Cream the butter and shortening in the bowl of an electric or stand mixer. Add the vanilla extract, salt and caramel syrup and combine well. Begin adding in the sugar and mixing thoroughly after each addition. After all of the sugar has been added and mixed thoroughly, give it a taste and decide if you want to add in more caramel syrup. For thicker frosting you can gradually add in a little more sugar.
Garnish with chopped Snickers bars and a drizzle of caramel of caramel syrup.

Recipe Source: My Baking Addiction

*Note: This recipe uses Jamie's Doctored up Cake Mix recipe which she uses for every cupcake she makes. And it is heaven. I've even used it in place of other chocolate cake recipes! {Although I always leave the espresso granules out and it turns out great}