 |
| Photo Credit to Mel's Kitchen Cafe |
Makes about 16 Bars
- Brownie Layer:
10 tablespoons butter
1 1/4 cups sugar
3/4 cup plus 2 tablespoons unsweetened cocoa powder (natural or Dutch-process)
1/2 teaspoon salt
1/2 teaspoon pure vanilla extract
2 large eggs
1/2 cup all-purpose flour
- Ice Cream Layer:
1 quart good-quality vanilla ice cream (storebought or homemade)
- Magic Shell Layer:
3/4 cup coconut oil
2 cups semisweet chocolate chips
- Caramel Sauce:
1-2 cups good-quality storebought or homemade caramel sauce
For the brownies, position a rack in the lower third of the oven and preheat the oven to 325°F. Line the bottom and sides of an 8×8-inch square baking pan with aluminum foil, leaving an overhang on two opposite sides. Lightly grease with cooking spray and set aside.
- Combine the butter, sugar, cocoa, and salt in a medium microwave-safe bowl. Microwave for one minute intervals, stirring in between, until the butter is melted and the mixture is smooth. Set the mixture aside until it cools slightly (is warm to the touch not hot). It will look gritty but it will become smooth once the other ingredients are added. Stir in the vanilla with a wooden spoon or rubber spatula. Add the eggs one at a time, stirring vigorously after each one. When the batter looks thick, shiny, and well blended, add the flour and stir until you cannot see it any longer, then beat vigorously for 40 strokes with the wooden spoon or a rubber spatula. Spread evenly in the lined pan.
- Bake until a toothpick inserted into the center emerges slightly moist with batter, 20 to 25 minutes. Let cool completely on a rack and then chill in the refrigerator or freezer until thoroughly cold - this will help the brownies hold up well to the ice cream layer that's coming.
- For the ice cream layer, soften the ice cream to spreading consistency (leaving at room temperature for 15-20 minutes should do the trick), then spread an even layer across the chilled brownies. The ice cream layer should be about an inch thick. Put the pan in the freezer until very firm (1-2 hours).
- For the magic shell, in a microwave-safe bowl, combine the coconut oil and chocolate chips. It helps if the bowl is more tall than wide so that when you dip the bars, the chocolate mixture is deep and not super shallow. Microwave for one minute intervals at 50% power until the chocolate is melted. Stir the mixture until it is smooth. It will be fairly runny.
- Remove the pan of brownies from the freezer. Gently lift the foil handles and remove the ice cream layered brownies from the pan. Cut the browines in half. Then, working with one half at a time (you might want to return the other half to the freezer if your kitchen is overly warm), cut rectangle into long, thin bars, about 1-inch by 4-inches. You should end up with 8 or so bars per half. Repeat with the remaining half. It is best to put all the cut bars onto a tray or plate and keep them in the refrigerator while dipping so they stay as cold as possible.
- Place a baking rack over a sheet of parchment paper or waxed paper or even aluminum foil (to help with cleanup). Working one-by-one, gently hold the ice cream bar at the base of the brownie and dip it quickly into the chocolate shell mixture (tilt the bowl to help deepen the chocolate for easier dipping) until completely coated and place on the baking rack. Your hands will get messy but I promise it's worth it! Repeat the dipping process with each bar. After I dipped about 5-7 bars and the chocolate shell had hardened (it sets up very quickly, especially if your ice cream and brownie is very cold), I gently removed them from the cooling rack and put them in the freezer so the ice cream didn't melt and kept dipping the other bars that were waiting in the freezer.
- Make note that the chocolate shell mixture will want to stick to the baking rack so pry the eskimo bars carefully off the baking rack so the chocolate shell doesn't crack as you separate them from where the chocolate has hardened to the rack.
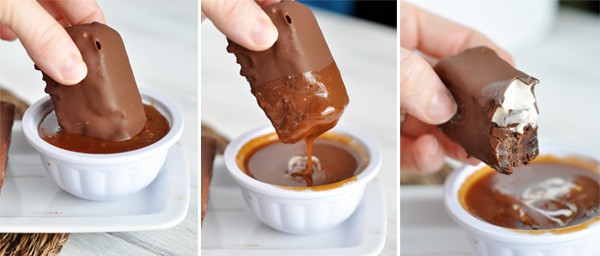
- When ready to serve, remove the eskimo bars from the freezer and let them sit at room temperature for 5-7 minutes. Warm the caramel sauce until it is runny and slightly warm but not overly hot (you don't want any burned fingers).
- Dip the eskimo bars in the caramel and enjoy!
Recipe Source: Mel's Kitchen Cafe

No comments:
Post a Comment